![Pay Cat Logo New 2.png]](https://www.paycat.com.au/hs-fs/hubfs/Pay%20Cat%20Logo%20New%202.png?height=50&name=Pay%20Cat%20Logo%20New%202.png)
An update event is used to report changes to employee YTD amounts previously reported to the ATO. Update events are not associated to any pay runs and thus should only be created when an employee payment has not been made. Other examples of why an update event would be created include:
-
Upon transferring YTD payroll data from one payroll system to another to align the latest employer BMS data with the last employee data reported to the ATO;
- Upon transitioning from Phase 1 to Phase 2 and prior to lodging the first pay event in Phase 2 mode;
-
To assist with EOFY processes, including finalisation and amendments to STP. After 30 June, any changes made to reported employee data for the prior financial year must only be submitted through an update event. NB. If an employee has already been included in a finalisation event for the financial year they will not show up in an Update event - to update STP data in these cases you need to create an Amended Finalisation Event for the appropriate pay schedule and add the employee to it - click on this link for more details.
For a short video on how to create and lodge an update event see here.
Creating an Update Event
An update event can only be created via Reports > Single Touch Payroll (listed under "ATO Reporting").
To create an update event, click on "Create update event" in the table header. A popup will appear and the filtering options will vary depending on whether the business also has closely held employees being reported on a quarterly basis, as follows:
If there are no quarterly reported closely held employees in the business
Select the financial year and pay schedule pertaining to this update event and then click on "Create":

If there are quarterly reported closely held employees in the business and you want to create an update event for the closely held employees
Select the financial year and click on the "Closely held employees (reported quarterly)" radio button and then click on "Create":

A list of all employees attached to that pay schedule (or only quarterly reported closely held employees) will appear on the screen along with their year to date details:
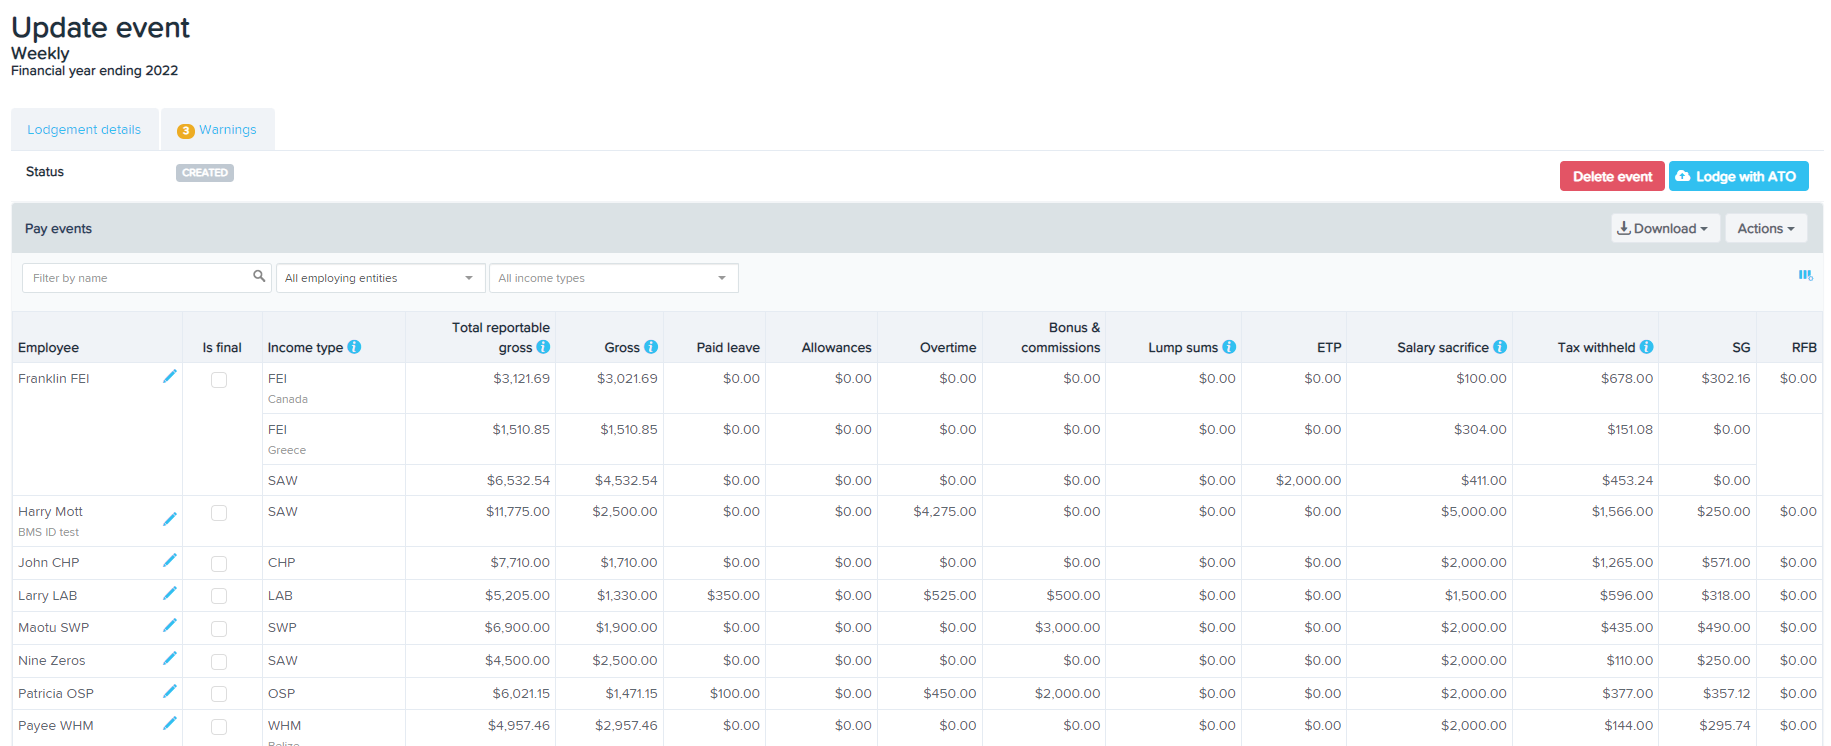
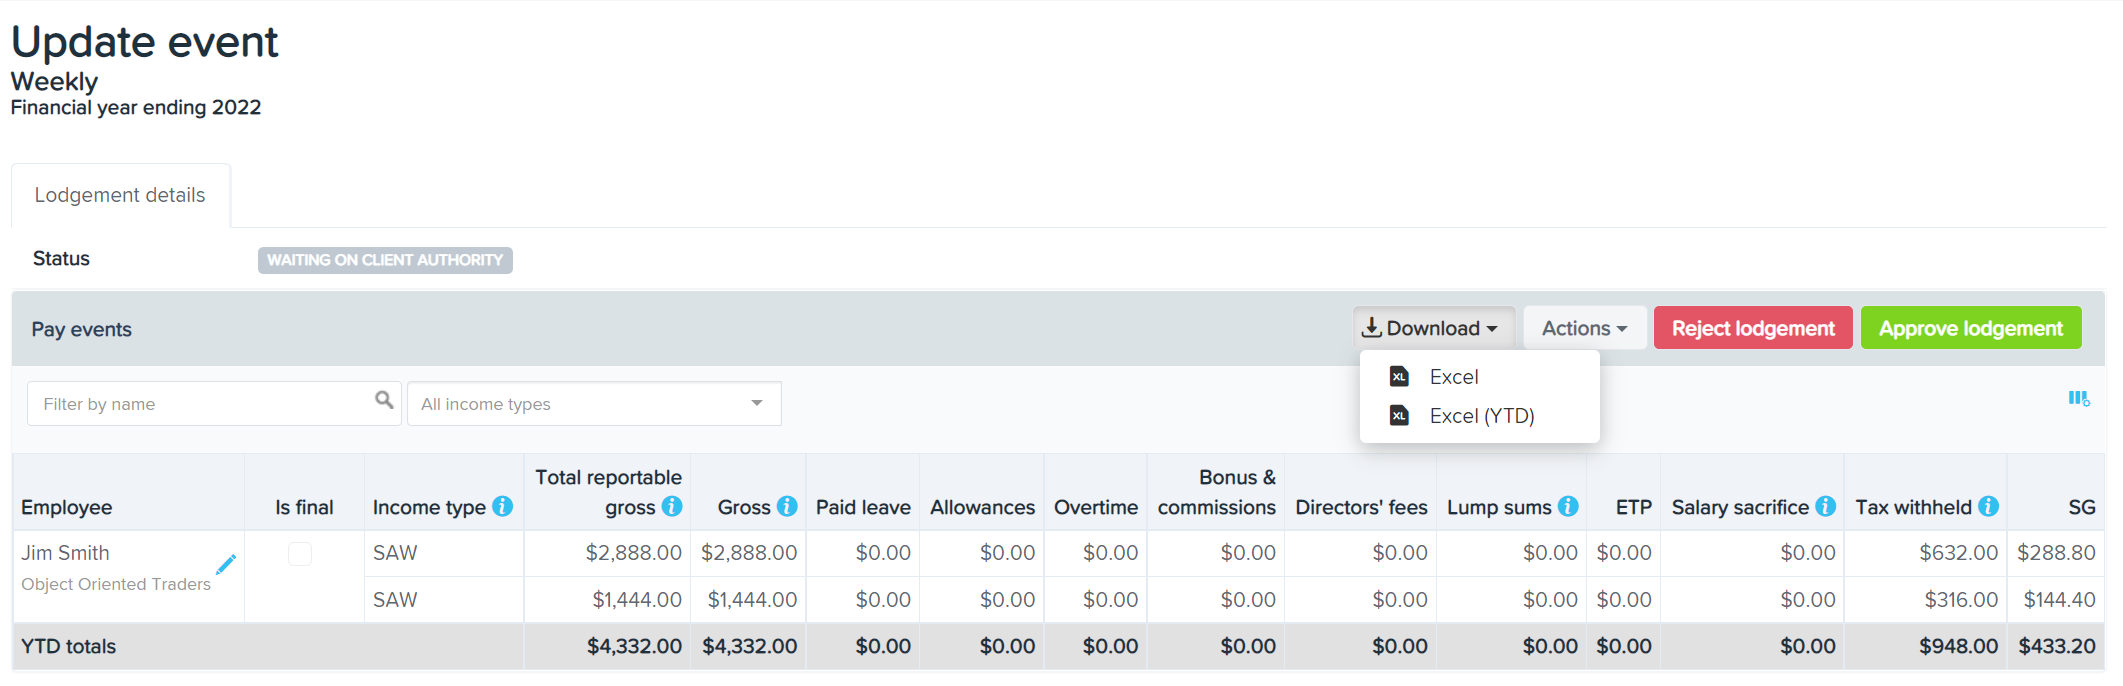
A few things to point out when an update event is generated:
- You can filter your view by searching for a specific employee or by employing entity (if you have more than one employing entity set up in the business). Please note however that when the event is lodged it will lodge for ALL employees in that pay schedule; that is, the filtering does not filter the data lodged with the ATO.
- You can use the Download button to generate an excel report of the data contained in this pay event. This report can be generated at any time - upon creation of the event through to post lodgement of the event.
- You can customise which columns are displayed by selecting the Table columns settings (blue icon with three vertical lines). Columns can be displayed or hidden using the context panel that appears, as required by the business. The column preferences selected here will appear for all events and all users on the business.
- Employees who have been employed by more than one employing entity during the financial year will have a row of data per employing entity.
- Employees who have changed STP Income Types during a financial year will have a row of data for each income type with earnings recorded.
- Totals for each column will appear at the bottom of the event.
Marking employees as 'Is Final'
If an employee has terminated employment and a termination pay has been processed, the "Is Final" checkbox will be ticked automatically. If the employee has not been terminated within a pay run and there will be no further payments for that employee in the financial year, you can tick the "Is Final" checkbox. This will indicate to the ATO that no further payments for this employee will be made. If an employee is reinstated and the same employee payroll ID is used, you will need to untick the "Is Final" checkbox.
Update Event Actions
You will notice there is "Actions" button on the right hand side of the even table, where you can undertake the following actions:
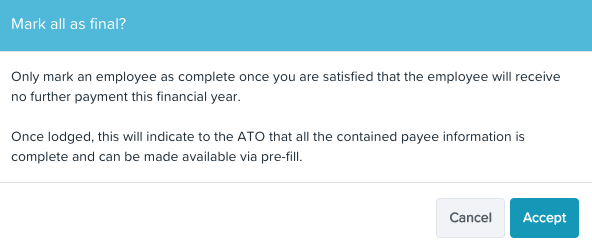
- Mark all as final: If no further employee payments are to be made during the financial year, the pay event can be marked as final. When an employer reports the finalisation declaration during the financial year, this replaces the employer’s obligation to provide the employee with a part year payment summary. Making this declaration will update the employee’s myGov display to show the STP information from the employer is final for the financial year. Pre-fill information will not be available until after 30 June. When clicking on "Mark all as final", the below popup will appear. Upon clicking "Accept", the "Is Final" checkbox will be automatically ticked for all employees in the pay event. If this was selected in error you can cancel the finalisation by clicking on Actions > Mark all as not final. N.B. Employees who were previously marked as "Is Final" (because of a termination pay) will remain marked as "Is Final".
- Mark all as not final: This action will only appear if there are employees in the event marked as "Is Final". Selecting this option will remove the checkbox from those employees, thereby denoting that the employees will still be receiving payments in that financial year.
- Add Employee: This action allows you to add employees missing from the update event. You may need to create an update event to rectify the issue of having incorrectly marked all employees as "Is Final" in a previous event. In this instance, when you click on "Add Employee" you will be given the option of adding all employees previously marked as final.
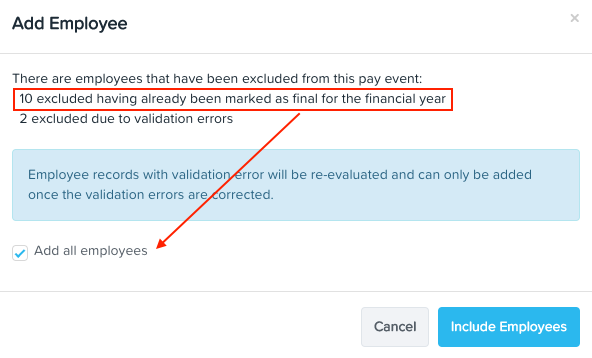
Alternatively, you can select employees one at a time. N.B: Employees that have been excluded because of validation issues can will only allow you to add them if the validation issue has been rectified.
- Request Client Authority: This action will only appear to businesses that are using Tax/BAS Agents to submit STP information to the ATO, as determined via their ATO Settings. A Client Authority may be required if (a) there is no Standing Authority or (b) this event does not cover a standard pay cycle and so the employer must provide a declaration to the agent approving the lodgement. When clicking on "Request Client Authority", the following popup will appear and should be completed as follows:
- User: When you click your mouse in the User field, a dropdown list of full access users and users with STP Pay Event Approver permission will appear. You can select one or more of these users to request client authority from. Take note that only one person is required to approve the event lodgement. Instructions on how to set up a user with STP Pay Event Approver permission can be found here.
- Notes: You can enter any notes here that you want the Client Authority to read when they are sent the request notification email.
When you click on "Submit Request", a notification email will be sent to the assigned Client Authority and the lodgement status will change from "Created" to "Waiting on client authority". The process thereafter is detailed further below.
- Refresh Data: This action can be used to refresh the payroll data contained in the update event. For example, if you created and finalised a pay run to fix employee payroll data and already have an update event created, you would then go back to the update event and refresh the data to ensure it up to date with actual payroll figures.
- Correct RESC values: We have made changes to the system on 4 November 2020 to prevent salary sacrifice payments being processed incorrectly. These changes are explained here. However, for historical payments that have been processed incorrectly, this action can be used for fixing incorrectly allocated payment methods against super salary sacrifice payments. Instructions on how to apply this action can be accessed here.Note: this action will only be available for FY21/22 and prior events.
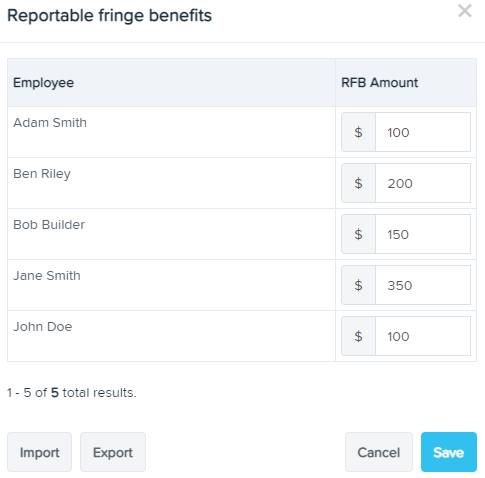
- Enter RFB amounts: This action is used to record RFB amounts for each employee. When you select this option, a context window will appear where you can enter in the grossed up RFBA value for each employee as required, and then select the Save button. The RFB amounts should always be entered in as a YTD value. Alternatively, you can use the Export button to download a template in Excel format, populate the worksheet with RFB amounts, then use the Import button to upload your RFB figures in bulk.
- Enter foreign tax paid: This action will only appear if and for an employee that has the 'Foreign employment' income type selected. It is used to record the amount of foreign tax incurred during the period the employee was earning money whilst working overseas. A foreign employment classified employee must have an amount of foreign tax reported via STP by no later than their finalisation event (whether the finalisation event is a result of ceasing employment or final reporting for the financial year) otherwise they will not satisfy the definition of foreign employment and will need to be re-classified as another income type. Further information on foreign employment can be accessed here.

Client Authority required to action an Update Event
An assigned client authority will be notified that they are required to action an update event via email. The email will include a link to the update event: 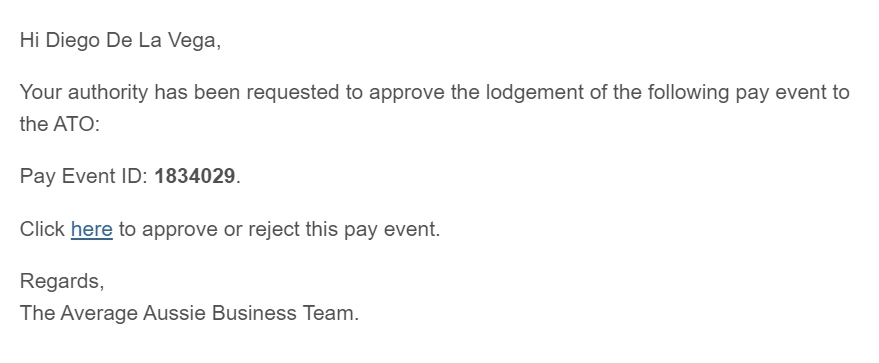
The authoriser will see the same information as the user who made the request but can only perform the following actions:
- Approve lodgement; or
- Reject lodgement; and
- Export an excel report of the update event.
If the authoriser rejects the lodgement, they will need to add a reason for the rejection. An email notification will then be sent advising them the update event has been rejected and the reason why. If you sent a request to more than one client authority, there is still the opportunity that another client authority approves the lodgement. However, if you have not, you will need to send another client authority request. N.B. You cannot send the request again to the same client authority who rejected the lodgement.
When the authoriser approves the lodgement, they will be required to complete a declaration, that will appear in the form of a popup:
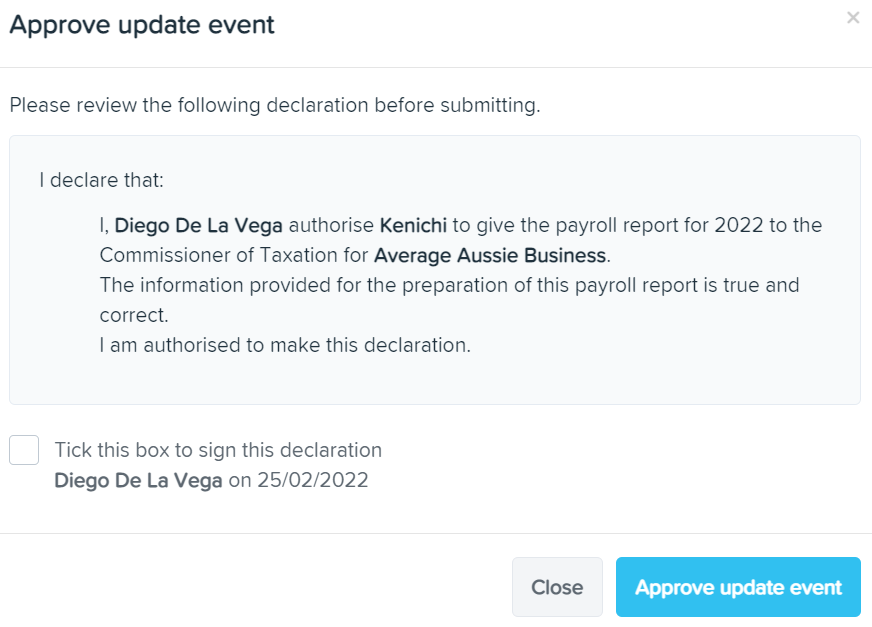
The client authority will need to select the checkbox and then click on "Approve Update Event". Once this is done, an email notification will be sent advising the lodgement has been approved. The lodgement status will change from "Waiting on client authority" to "Client Authorised" and you can now start the lodgement process.
N.B. To clarify, the requirement for a Client Authority approval is only required for businesses using a BAS/Tax Agent to submit STP lodgements to the ATO on their behalf.
Lodging an Update Event
To lodge an update event, click on "Lodge with ATO".
Side note: At this stage, if Two-Factor Authentication has been set up, you will be required to enter the verification code sent to you before you can proceed any further. You know this will be required when the following popup appears:

A lodgement declaration will appear in a popup that needs to be completed before the lodgement is complete. The instructions here are different depending on your ATO Settings:
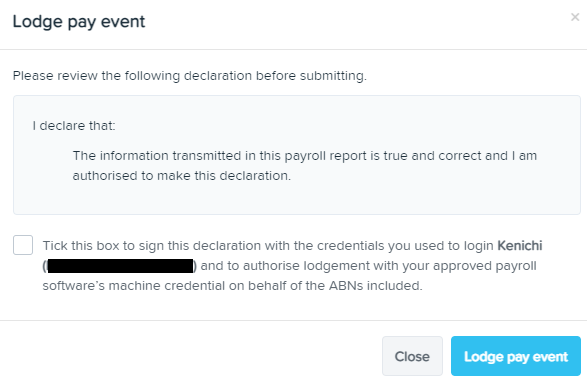
I will be lodging reports to the ATO as the Employer
The following popup will appear:
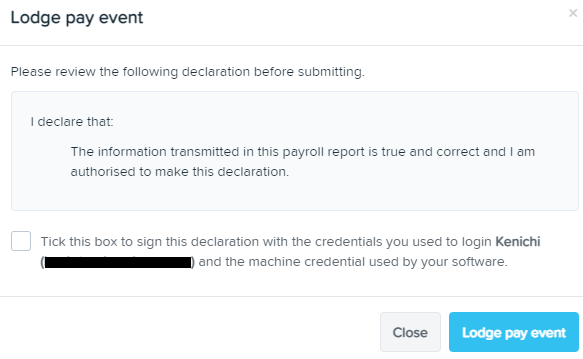
Tick the declaration checkbox and then click on "Lodge Update Event". The lodgement is then queued for ATO submission.
I will be lodging reports to the ATO as a registered Tax/BAS Agent
The following popup will appear:
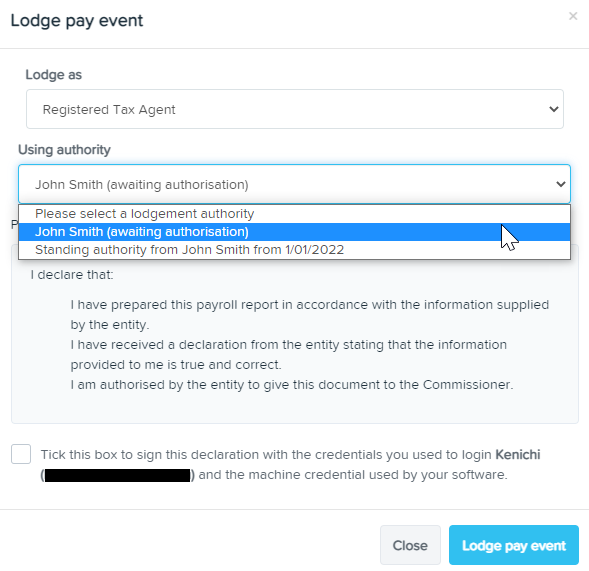
When completing the "Using authority" requirement, the dropdown list will show you any Standing Authority, along with any Client Authority who has either rejected the lodgement and/or approved the lodgement. You cannot select the authority who has rejected the lodgement. You should only be selecting a Standing Authority or Client Authority who has approved the lodgement. If there is no Standing Authority or Client Authority who has approved the lodgement, you cannot proceed with the lodgement and will need to obtain that authotity beforehand.
Once the relevant authority has been selected in the dropdown list, the only requirement thereafter is to tick the declaration checkbox and then click on "Lodge Update Event".
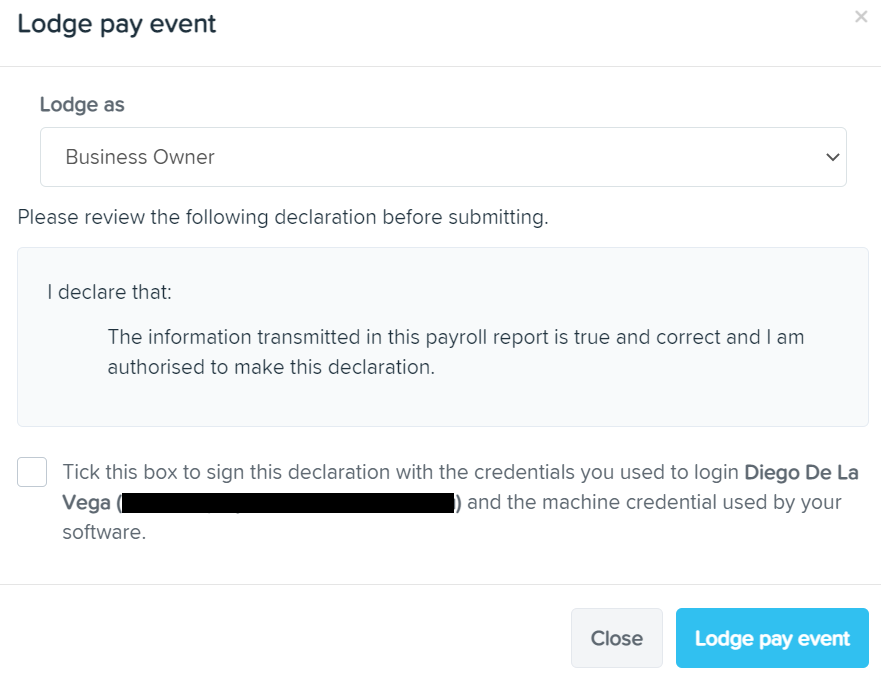
This ATO setting does not prevent a business owner from lodging update events with the ATO (so long as they are a full access user). The only difference here is the business owner will need to select "Business Owner" from the "Lodge as" dropdown list. This will then remove the "Using authority" requirement. The business owner then needs to tick the declaration checkbox and then click on "Lodge Update Event":
I will be lodging reports to the ATO as an intermediary for multiple Employing Entities
The following popup will appear:
Tick the declaration checkbox and then click on "Lodge Update Event". The lodgement is then queued for ATO submission.
Deleting an Update Event
Update events can only be deleted if their status is 'created', waiting on client authority', 'client authorised' or 'failed'. To delete an update event, simply click on the 'Delete Update Event' option from within the update event > Lodgement Details tab:

A confirmation popup will appear:
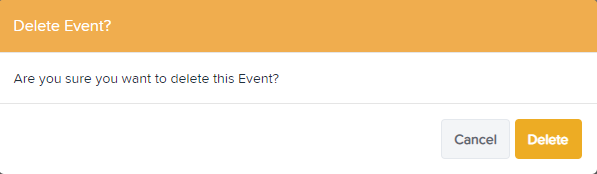
To confirm, click on 'Delete'. Once the update event has been deleted it will be removed from the Single Touch Payroll page > events list.
Our complete STP Guide can be found here.
If you have any questions or feedback, please let us know via support@yourpayroll.com.au
Article is closed for comments.
Search for a feature, function or article…