![Pay Cat Logo New 2.png]](https://www.paycat.com.au/hs-fs/hubfs/Pay%20Cat%20Logo%20New%202.png?height=50&name=Pay%20Cat%20Logo%20New%202.png)
Under Settings / Facial Recognition you will see the following settings:
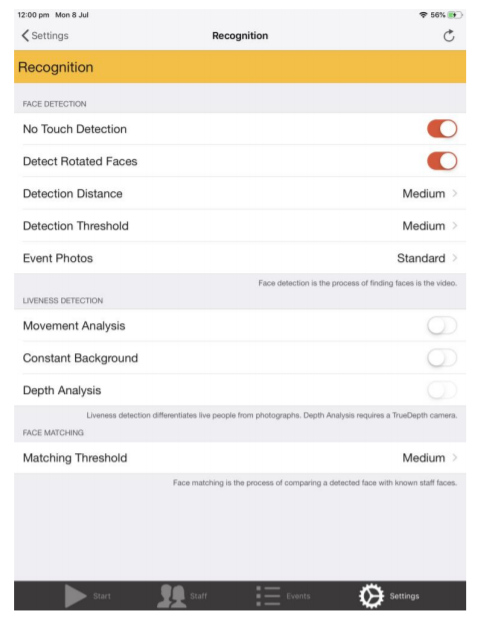
Each of these individual settings, with the exception of the Liveness Detection settings, is explained below.
No Touch Detection
With this setting turned on, NoahFace Access constantly scans for faces, and if it sees one, it will attempt to recognise it (ie: compare it with all its known faces). If you turn this setting off, you must first touch the screen before NoahFace Access will scan for faces.
The default is on. You should consider turning this setting off only if you are mounting NoahFace Access in a busy thoroughfare, and you don’t want it recognising faces that are passing by.
Detect Rotated Faces
With this setting turned on, NoahFace Access will recognise faces at up to a 30 degree angle.
With this setting tuned off, NoahFace Access will only recognise faces that are close to vertical.
The default is on. You should consider turning this setting off only if:
• You have very large numbers of faces (eg: well over 1000) that need to be recognised
at a single access point, and you want to achieve the fastest possible recognition speed.
• You want to take every measure possible to minimise the chances of an incorrect recognition (aka ‘false positive’).
Detection Threshold
The detection threshold controls the process of finding faces in the video.
If it is set to Very Low, if something in the image looks like it could be a face, it starts analysing it. If it is set to Very High, it needs to be extremely clear that it looks like a face before it will start analysing it.
The default is Medium, which should work well in almost all cases.
You should consider changing this to Low if:
• You have poor lighting conditions.
• You have people with extremely dark skin or thick glasses that you are having trouble detecting.
You generally should not change this setting to Very Low – if you find you need this setting at Very Low to detect anyone, you should instead consider adjusting the camera brightness, physical shading, or installing front lighting.
You should consider changing this to High, Very High, or Maximum if:
• You want to take every measure possible to minimise the chances of an incorrect
recognition (aka ‘false positive’).
Detection Distance
This setting controls the distance at which the NoahFace App will recognise faces. As per the diagram below, this ranges from ‘Very Near’, which requires you to stand approximately 60cm from the iPad, to ‘Very Far’, which will detect faces as far away as 1.8 metres.
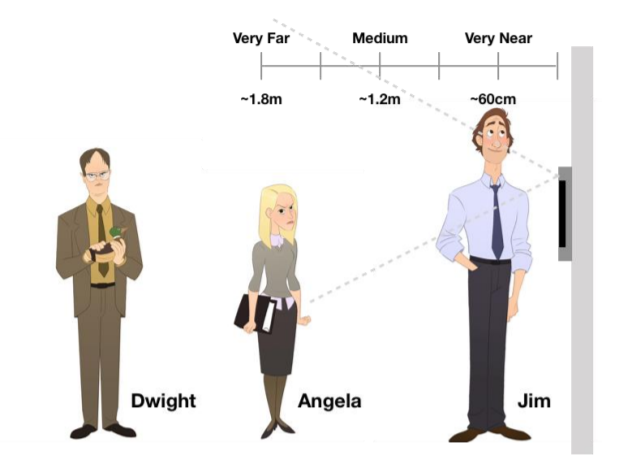
The default is Medium, which will detect faces at approximately 1.2 metres.
You should consider changing this to Near or Very Near if:
• Your solution requires users to press buttons (eg: for Time and Attendance).
• You are mounting your iPad in a busy thoroughfare, and you don’t want it recognising faces that are passing by.
• You want to take every measure possible to minimise the chances of an incorrect
recognition (aka ‘false positive’).
You should note that if you set this to Very Near, it may be difficult for extremely tall or extremely short people to get their faces in camera view.
You should consider changing this to Far or Very Far if:
• You have a door at the end of a long approach, and you want to maximise the chances of the person being recognised before they reach the door.
• You have people who are in wheelchairs.
Matching Threshold
Once a face is detected, NoahFace compares the face with all the faces of known individuals.
This setting controls how confident the software needs to be that a particular face is a known individual before declaring it a match.
When most people hear about this threshold, their immediate response is that they want it set for absolute certainty. Unfortunately, this is not possible: there is a direct tradeoff between recognition rates and the chances of making a mistake. You should instead think of the Matching Threshold using a graph such as the following:

Note that this is no different from human recognition of faces. If you were to look at 1000 images containing faces of people you knew, and had to always declare who each image was, there would be some images where you could not be absolutely certain (eg: because the images were blurry or the person had their face turned to the side), and you could make mistakes. If you are allowed to pass on 20 images, the chances of you making a mistake are less than if you are only allowed to pass on 1 image.
The default setting of Medium is an extremely strong setting, and provides the right balance between excellent recognition and minimal chances of making a mistake in the vast majority of environments.
You should consider changing this to High, Very High, or Maximum if:
- You want to take every measure possible to minimise the chances of an incorrect
recognition (aka ‘false positive’), and you are happy to live with a lower recognition
rate.
Minimising Incorrect Matches
If you want to take every measure possible to minimise the chances of an incorrect match (aka ‘false positive’), and you are happy to live with a lower recognition rate, you should have your recognition settings as follows:
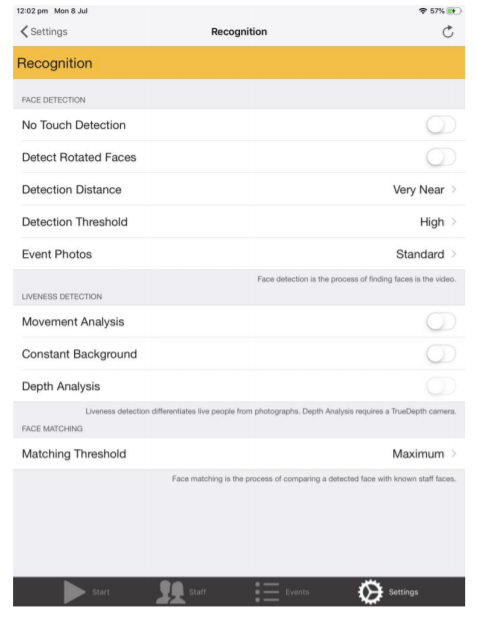
To be absolutely clear: these settings will not eliminate the possibility of an incorrect match, it just makes it much less likely than with the default settings. If you cannot accept this in your environment, you should consider using two-factor authentication.