![Pay Cat Logo New 2.png]](https://www.paycat.com.au/hs-fs/hubfs/Pay%20Cat%20Logo%20New%202.png?height=50&name=Pay%20Cat%20Logo%20New%202.png)
Getting Started
Start by logging into the NoahFace Dashboard and selecting the organisation that you want to use Temperature Screening with.
Access Point Types
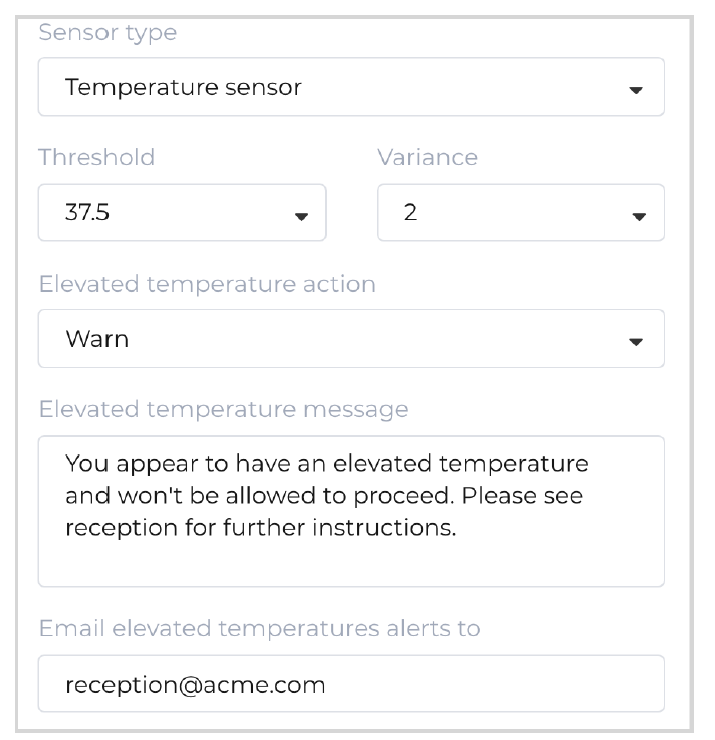
Select the Access Points menu and then the Access Point Types tab, and then either add or modify your access point type. Set the following options which relate to Temperature Screening:
• Sensor type. Set this to “Temperature sensor”.
• Threshold. Set this to the maximum acceptable temperature (C or F). A threshold of No means that if a person’s temperature is higher than No, it will be considered to be elevated. The default threshold is 37.5C or 99F.
• Variance. Set this to the maximum acceptable variance between a person’s temperature and their expected temperature. A variance of No means that if a person’s temperature is more than No above their expected temperature, it will be considered to be elevated, even if it does not exceed the threshold. A person’s expected temperature is calculated using a combination of that person’s average temperature (over recent events) and the average temperature of all people (over recent events). The default variance is 2.
• Elevated temperature action. This can be set to:
-
- Record. Simply record the temperature.
- Warn. Display the elevated temperature message.
- Deny. Display the elevated temperature message and stop the person from proceeding.
- Elevated temperature message. The message that is shown to people with elevated temperatures when the action is set to “Warn” or “Deny”.
- Elevated temperature email address. If an email address is provided, alerts will be sent to this email address when an elevated temperature is detected. You can only send alerts to a single email address, so if you want to send alerts to multiple recipients, you need to use a group email address or distribution group.
Note: Alerts are sent from the Cloud, so your data storage must be set to “Cloud” for alerts to be sent.
The access point type settings can be seen below:
Recommended Threshold/Variance Settings
It is recommended to set the Threshold at approximately 38.0C or 100.4F. It is recommended to set the Variance to approximately 1.5C or 3F. This will mean NoahFace triggers elevated temperature alerts primarily based on each individual’s expected temperature, which will minimise both false positives and false negatives.
Screen Type
The Screen type of your access point type controls which screen will be displayed. The most common screen types are:
- Clock In/Out. This is used to record time worked into a payroll system.
- Access Control. This is used to open doors.
The feedback icons can also be customised.
You can find out more about configuring your screen type here:
https://www.noahface.com/kiosk-screen-configuration
Access Points
Select Access Points menu and then the Access Points tab, and then either add or modify your access point. Set the Access point type as appropriate and set the Sensor identifier to the serial number of the sensor used at this access point.
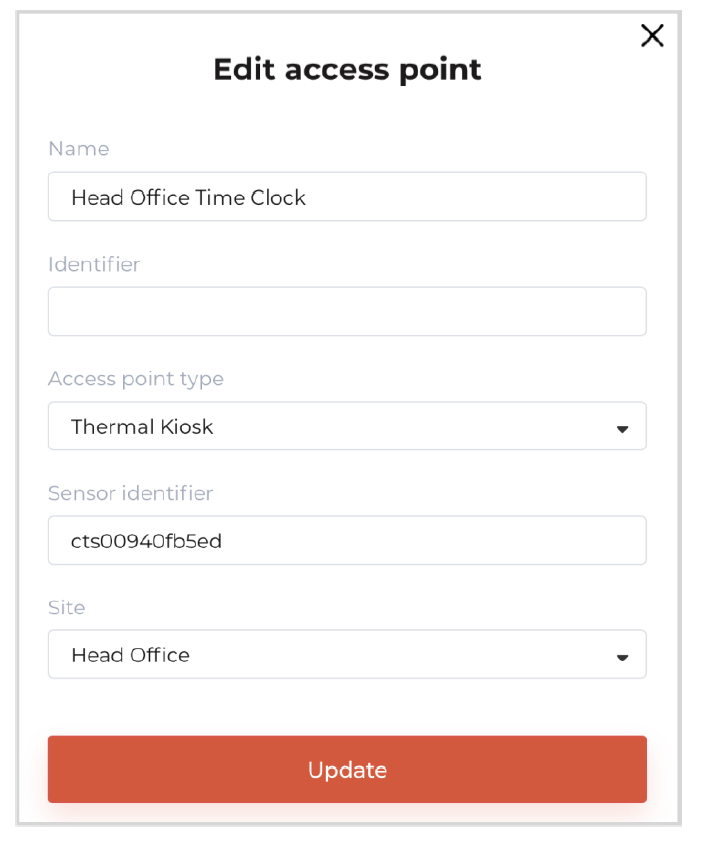
Note: When you add or activate your access point, you will be presented with the activation code you will need to connect the NoahFace App.
Note: It is possible to leave the Sensor Identifier blank and to enter it within the NoahFace App. It is also possible to enter a value of “DEMO”, and the NoahFace App will generate random temperatures in the range: 36C - 38.0C (96.8C - 100.4F).
Registration
Once you have your iPad mounted on the wall and connected to the Cloud, you are ready to register users.
During the registration process the user’s temperature is taken. If their temperature is normal, the thermometer icon in the top right will turn green, and the Register button will become enabled:
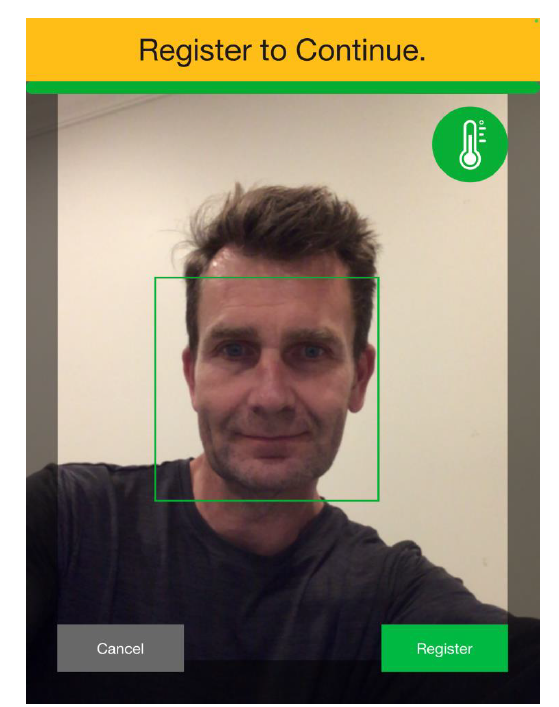
If their temperature is elevated, the thermometer icon in the top right will turn red, and the Register button will only be enabled if the Elevated temperature action on the access point is set to “Warn” or “Record”. If it is set to “Deny”, then the user will not be able to register with an elevated temperature.
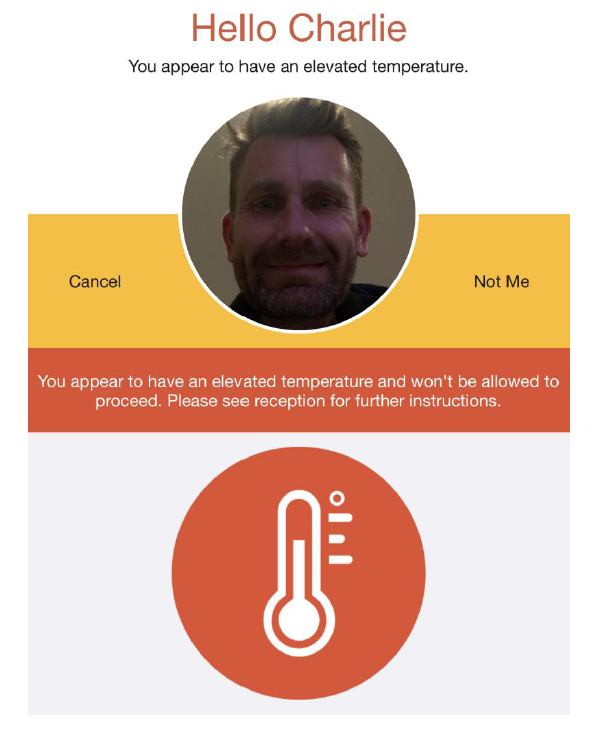
Every Day Use
When users are recognised as part of the process of clocking-on for work or entering a secure area, their temperature is automatically taken. If their temperature is normal, they will see positive feedback (eg: a green tick) when they complete their action (eg: clock in or unlock the door). If their temperature is elevated, the behaviour is dependent on the configured Elevated temperature action as follows:
- Record. The temperature will be recorded with the event, and may trigger an alert, but the user will not receive any feedback and will be able to complete their action.
- Warn. The configured message will be displayed, and the user will be able to complete their action.
- Deny. The configured message will be displayed, and the user will NOT be able to complete their action, and they will see the elevated temperature feedback (eg: a red thermometer).
An example of this feedback can be seen below: