![Pay Cat Logo New 2.png]](https://www.paycat.com.au/hs-fs/hubfs/Pay%20Cat%20Logo%20New%202.png?height=50&name=Pay%20Cat%20Logo%20New%202.png)
Allowances can be automated to be triggered within a pay run. This article will look at automating 4 different allowances. They are:
- Meal allowance (using overtime hours)
- Tool allowance (using tags)
- Cold work allowance (using work types)
- Site allowance (using locations)
Note: Pay condition rules work by interpreting timesheet data into the pay run so, if you aren't using timesheets the rules won't/can't do anything.
Note: Rule sets are only available on the Advanced/Plus plan.
Configuring the pay categories
You'll first need to set your pay categories up. To do this, go to the 'Payroll settings > Pay categories' page and add a new pay category for the allowance that you want to pay. You don't want this pay category to be a linked pay category as you want to be able to set the rate separate to any base rate that the employee is already linked to.
When you create the pay categories for each allowance, carefully set the other parameters, e.g. the meal & tool allowance will not attract super, and will be PAYG exempt, but the site allowance will attract super and PAYG. It is up to you to set this up correctly depending on the requirements. Importantly though, these allowances should (usually) be set to be 'fixed' allowances, not 'hourly', 'annually' etc.
More information about pay categories can be found here.
Configuring the work types
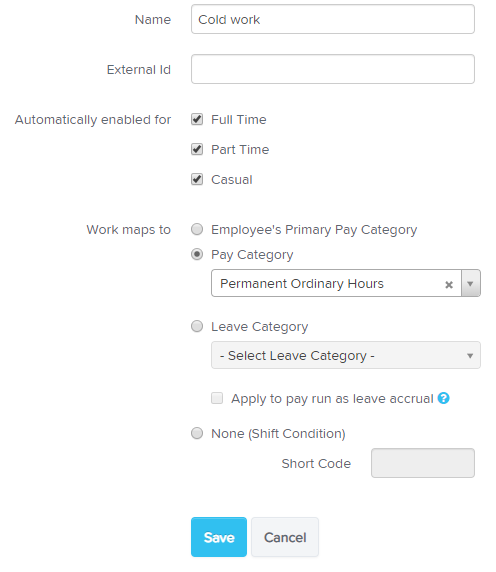
You'll also need to create a work type in order for employees to indicate that they are due an allowance via timesheets. We are going to create one for the 'Cold work' allowance scenario.
To do this, go to the Payroll settings > Work types page and click the 'Add' button on the right hand side. Call it 'work under 0 degrees', and enable it for full time, part time and casual employees. In this scenario, it is linking to the 'Permanent ordinary hours' instead of the allowance pay category because the rules will apply it as needed. This will be explained further on. See below for how the work type set up will look:
Configuring Tags
You can apply tags to specific employees, and then use them in rule sets as a way of specifying individual or groups of employee in which a specific rule should apply. For example, in the case of allowances, we can use a tag to decide whether an employee gets a specific type of allowance or not.
You'll need to go to the Payroll settings > Tags page and add a tag that says something like "uses own tools". Once you add the tag you'll be able to apply it to the required employees by ticking the box alongside their name.
In addition to the 'Tags' page, you can also add tags directly via the Employee file > Details page by scrolling down the bottom and typing straight into the 'Tags' field.
Configuring the rule sets
If your employees are already attached to a rule set, you will need to add the rules in addition to the existing rule set so that they are still linked to the other existing rules. To do this, go to the 'Payroll settings' > 'Rule sets' page and click on the existing rule set. If they are attached to an award, you'll need to select the award first from the drop down box.
If your employee is not already attached to a rule set, and you don't want these rules to be part of any existing rule set, you can create a new one for this purpose. To do that, go to the 'Payroll settings' > 'Rule sets' page, and click the 'Add' button to the right of the page.
One thing to note about rule sets before going further is that rule sets work in order of evaluation from top to bottom, meaning the processing of the rules at the bottom happens last. In most cases, you want something that pays the employees more to happen at the bottom.
Automating a meal allowance (using overtime hours)
Usually a meal allowance is when you start working overtime, after a particular amount of overtime, you receive 1 unit of meal allowance. The below setup is an example of automating an allowance that requires an employee to have work a certain number of hours before it is triggered.
You'll need to:
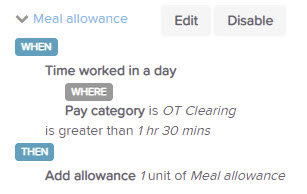
- Add a rule called 'Meal allowance'
- WHEN time worked in a day
- WHERE (you'll need to click the cog icon on the right to see this option) pay category is overtime clearing (for example). You may select a different pay category here....basically whichever hours the meal allowance should be based off.
- Is greater than 1.5 hours (for example when using overtime clearing, but if you are using an 'ordinary hours' pay category, you might want the meal allowance to be triggered after 38 hours.
- THEN add allowance of 1 unit of meal allowance per shift
- Click 'Save'
The above scenario will look like this:
Automating a tool allowance (using tags)
A tool allowance is usually quoted as a figure per week, so this rule is set up as:
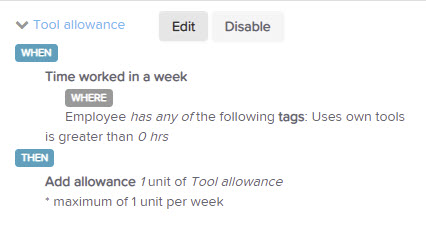
- Add a rule called 'tool allowance'
- WHEN time worked in a week
- WHERE (you'll need to click the cog icon on the right to see this option) tags, employee has, 'tool allowance' tags is greater than 0 hours
- THEN add allowance
- of 1 unit of tool allowance per shift with a limit of 1 per week.
In regards to the order of the rules, in this case it doesn't really matter where it sits as it is independent and will not impact on any other rules within the rule set.
Automating a cold work allowance (using work types)
Employees that work in cold conditions (freezers for example) are entitled to a cold work allowance per hour worked in those conditions. This is why we have created a work type earlier for this allowance, as it allows the employee to enter a timesheet for the hours worked in those conditions so that the system will know how many hours it needs to pay the allowance for.
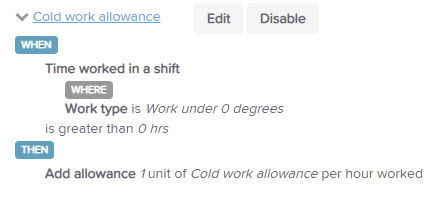
- Add a rule called 'cold work allowance'
- WHEN time worked in a shift
- WHERE (you'll need to click the cog icon on the right to see this option) work type is 'work under 0 degrees'
- is greater than 0 hours
- THEN add allowance
- 1 unit of cold work allowance per hour worked
- Click 'save'
In this scenario, the employee will still be paid their normal earnings for the work, but in addition to that will be the cold work allowance to the time that they use the work type.
Automating a site allowance (using locations)
A site allowance is usually a prescribed rate for working at a particular job to reimburse the employee for certain conditions that they have for working on site. A business that uses this allowance usually will have multiple locations set up (does not have to be geographical) that link to each specific site/job. These locations are then utilised in the rule set to pay the allowance. You'll need to:
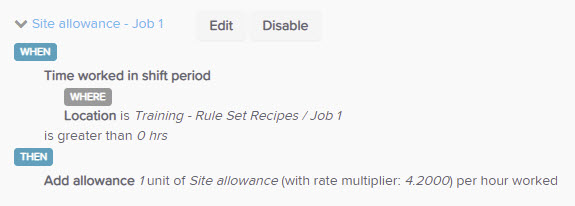
- Add a rule called 'site allowance'
- WHEN time worked in a shift period
- WHERE (you'll need to click the cog icon on the right to see this option) location is XXX is greater than 0 hours
- THEN add a site allowance of 1 unit per hour worked.
- The rate multiplier comes in handy here because it allows you to pay different rates according to the location. For example, you might want to pay double time at location A, and triple time at location B. If that is the case, you can create multiple rules for each location and repeat the above process.
- Click 'Save'
These 4 different scenarios can be applied to other allowances (e.g. first aid, clothing) as required.
Testing the rules
You can check what's happening for each shift by using the rules tester...
- go to the Rule Sets page (under the pay conditions heading on the payroll settings tab)
- select the Award from the drop down menu at the top of the page (if nec)
- select the rule set you want to check
- hit the Test Rules button
- check the current period dates (the pay run period dates should match exactly to the current period or a previous period)
- click on the Import button
- select the employee whose shifts you want to test
- scroll down and hit Run Test
Once each day's earnings are displayed you can expand the day you want to check and click on the question mark to show you the list of rules that have been triggered by that shift, eg...
Then you can go check each rule that was triggered and see how/why it has been applied to that shift - keep in mind that rules are applied in order from top to bottom so a rule that's triggered may be overridden by another rule further down the list.
Please reach out to us at support@paycat.com.au should you have any questions or concerns.