![Pay Cat Logo New 2.png]](https://www.paycat.com.au/hs-fs/hubfs/Pay%20Cat%20Logo%20New%202.png?height=50&name=Pay%20Cat%20Logo%20New%202.png)
The brand management section allows partners and brand users access to a range of brand functions straight from the partner dashboard.
The functions available via the brand management page include:
Brand management home page
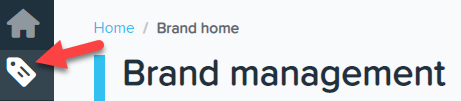
You can access brand management from the partner dashboard by clicking on the "Brand" tag as shown below:
Once here, any brand that you have access to will be listed. N.B: If you have partner access, you have brand access by default to any brand that exists under the partner account.
If, under your user account you have access to brands that span multiple regions, you will see a region filter and that will list the regions that you have access to.
To the right of the page there is an ‘export’ button, and this will run an excel report showing the following details:
- Partner Id;
- Partner Name;
- Partner Users;
- Brand Id;
- Brand Name;
- Brand Users;
- Payroll Champions;
- Number of Businesses;
- Region

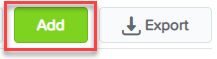
When logged in as a partner, you are also able to click the ‘add’ button which will allow you to add another brand by taking you to the 'add brand wizard':
The columns on the brand management page include:

- Brand ID number;
- Name of the brand - if you click on the highlighted name of a brand within this column you'll be taken to the 'details' page;
- Partner - If the brand exists under a partner account, the name of the partner account will be listed here. If not, this field will be blank;
- Region - This will display the region that the partner account/brand was created in. E.g. Australia, New Zealand, UK, Singapore;
- Host name - Is the URL that hosts the business file;
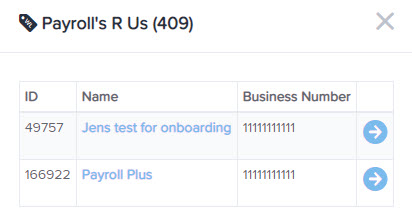
- Number of businesses - If you click on the number in the ‘number of businesses’ column a separate box will show the names of the businesses. You can go into the actual business by clicking the arrow icon to the right of the business number. This will take you directly to that business via a new tab. If you click on the highlighted name of the business you will be taken to the business maintenance page:
More information on the business maintenance functions can be found here.
Details
The details page covers the following details (which can be edited by a user with partner access):
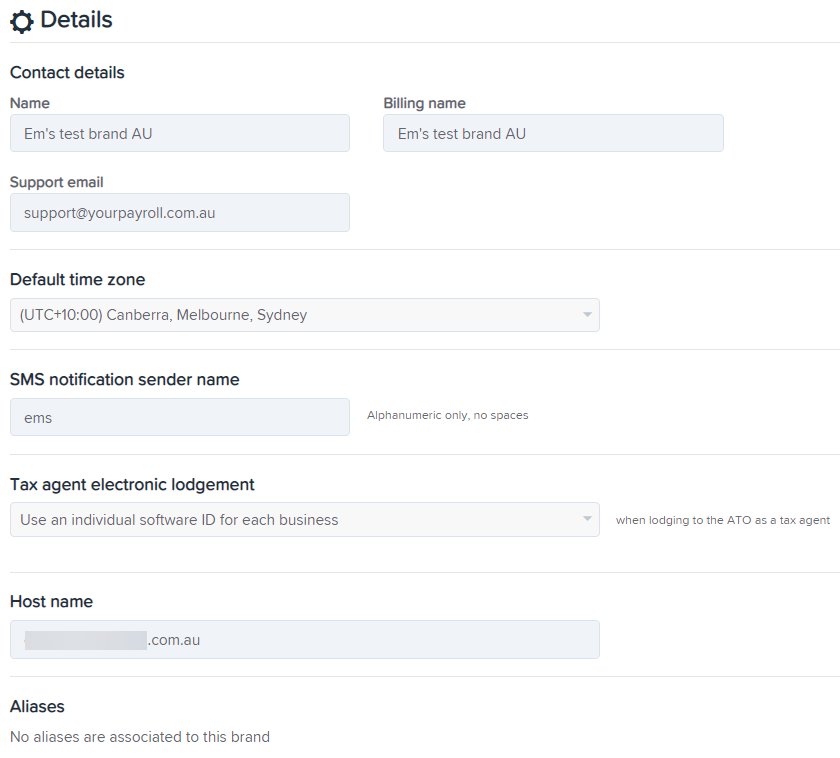
- Name: Name of the brand
- Billing name: Name that you want to appear on the invoice
- Support email address: This email address will appear in support articles in lieu of support@yourpayroll.com.au. There may be instances where this field is already pre-populated with an address - this will be the case if you have entered billing details in your partner settings.
- Default time zone: The time zone is set by default based on the region selected when the brand was added
- SMS notification sender name: The value entered here will be used as the 'From' display when employees receive sms via the platform. This is a compulsory field, even if you do not intend to switch on sms notifications, which is done at a business level.
- Tax agent electronic lodgement: This relates to STP lodgements. More information on this can be found here.
- Host name: This is the URL specific to the brand that users will access to log in to the platform and their business(es) created under the brand. The default domain is *.yourpayroll.com.au, however you can arrange for a custom domain. If a custom domain has been organised, both the default and custom domain options will be available when setting up the host name. The value entered here will be checked for uniqueness. If the host name is already in use, you will not be able to proceed to the next step unless it is changed.
- Aliases: If you have organised your own custom domain, you can set this up as an alias that will ultimately point to the host name and allow the user to access the same business(es) whether they logged in using the host name or alias URL. Take note that the management of custom domains are the responsibility of the partner. You should ensure it is set up correctly so as not to affect your clients using the alias to log in to the platform and therefore being unable to access their business. Take note that this field is not compulsory.
Billing
The details and functions on this page will vary depending on whether or not the brand sits under a partner account, and if the brand or business/es are billed directly.
The different scenarios are:
If the brand is billed at the partner level no billing information can be entered/edited. Users with partner level access will need to log into the partner account in order to edit/change billing details.
If the brand is not billed at the partner level (or if there is no partner account) you will need to add a Visa or Mastercard. If there is inactivity for 3 months, you'll need to repeat the process of adding credit card details.
If the brand is not billed at the partner level (or if there is no partner account) AND if a card has been successfully added, you will see your most recent payment activity, along with the registered credit card details (hidden aside from the last 4 digits).
From here, you can change the email account that invoices are sent to, and remove the current card in order to add a new one.
Pricing & features
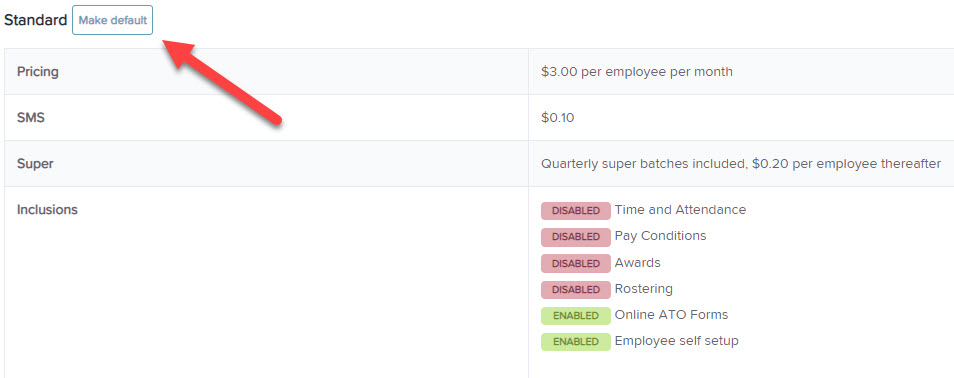
This page shows any pricing plans that have been created at the partner level, or if there is no linked partner account, this is what was set up when the brand was created.
You'll see a 'default plan' label against the plan that has been nominated as the default plan for the partner/brand account:
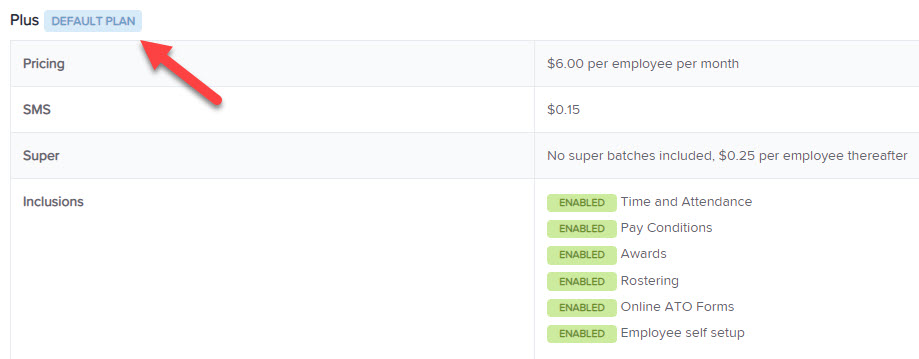
This is read only and cannot be edited by brand users, however users with partner access can change the default plan by clicking the ‘make default’ button against the plan that you are wanting to make your default:
Contacts
This page will show the details the email address of the user who has been nominated as a 'payroll champion', 'technical contact' 'sales contact' and 'marketing contact' for the brand. Payroll champions and a technical contact are the only representatives for that brand that can submit support requests and the support team can communicate with them. If a user has not been nominated as a payroll champion, the support team will be unable to communicate with them.
Please note the 'Technical contact' as the name suggests, is the technical contact reaching out to support on technical enquiries, such as API, integrations.
There are a few scenarios that will affect the view of this page:
If you haven’t selected any payroll champions, and have permission to edit this at a brand level you can do that here, and this must be done before we can reply to any support requests:
If you have already added payroll champions and have permission to edit this at a brand level you will see their email address listed here. You can edit the list by clicking on the drop down arrow to select a different user. If you need to remove a user from being a payroll champion, click the 'X' within the name field.
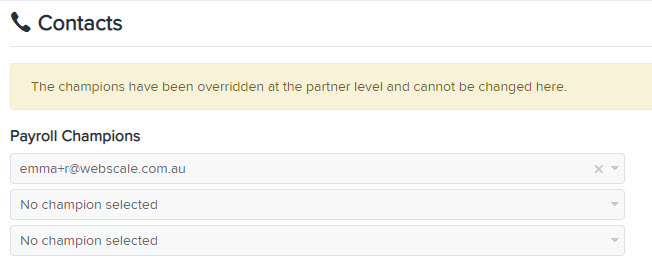
If payroll champions are set at the partner level the contacts page will be hidden. A fellow payroll champion or user with partner level access will need to get in contact with our support team to change any existing payroll champion details:
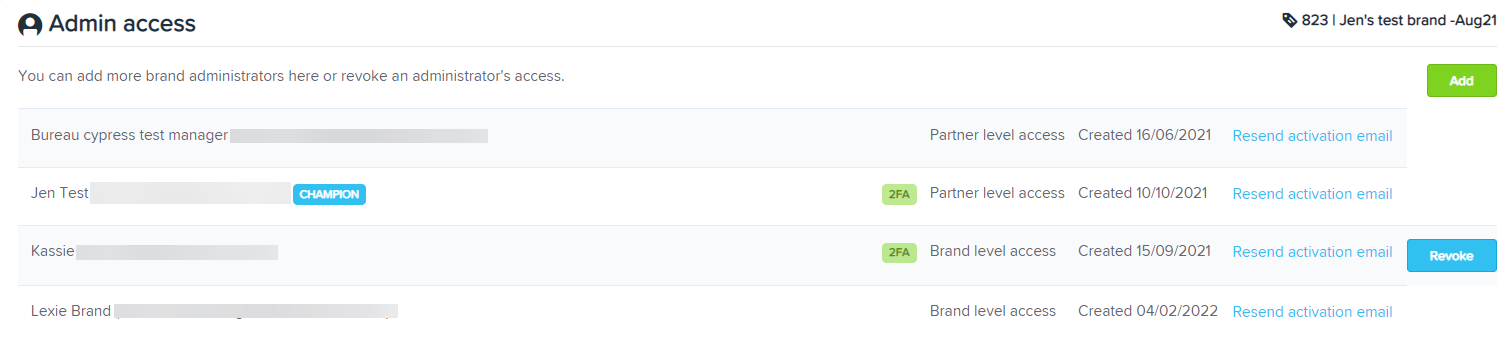
On this page you will see all users that have been given access to the brand. By default, any users with partner level access has access to all brands under the partner account. Having user access to the brand is different from being listed as a contact, in that the support team cannot reply to your requests for help unless you are listed as a payroll champion. Payroll champions are identified by the ‘champion’ tag next to their name, and a '2FA' label will appear if the user has enabled two-factor authentication.
Both brand managers and partner access users can add a user by selecting the 'add' button (they will be given brand access) and revoke a brand user from this page selecting the 'revoke' button (you cannot revoke access for a user with partner access). In addition to this, you will see the users that have access to the brand, what type of access they have (i.e. brand or partner) and the date that the user was created. You can also send them another activation email which will allow them to reset their login password:
Invoices
This page will display different information depending on whether or not the brand falls under a partner account, and if the partner account is invoiced directly.
If the brand falls under a partner account, and the partner is invoiced directly you will not be able to view any invoices for the brand, and furthermore, you will not see the 'Invoice' option at all on the dashboard.
If the brand falls under a partner account, and the partner is NOT invoiced directly OR the brand does not belong to a partner account you will see a list of invoice ID's along with the date they were issued, the amount and the status. You can click on the invoice ID in order to see the invoice details, and the 'download' option will allow you to download the invoice in either PDF or Excel format:

None of the invoice statuses can be actioned. E.g. if a payment has been declined, users cannot go in to reprocess the payment again.
Reports
There are 3 report options available on this page:
- New businesses: Shows businesses created in the brand over a period of time
- Active employees: Shows the number of employees included in billing activities and pay runs finalised at any one time for each business over a period of time
- Feature usage: Report on feature usage for each business listed under the brand
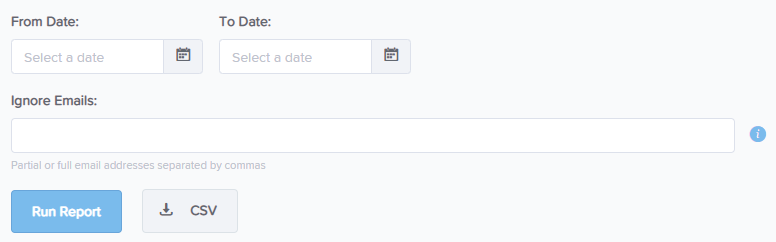
Within the 'new business' and 'active employee' report, the filter options are:
- From date
- To date
- Ignore emails: Within this field you can enter the email address of any full access users assigned to the business that you want to exclude from the results. This only relates to users that appear on the Payroll settings > Manager users page of a business:
New businesses report
When you run the business report the system will show the following columns:
- Id - This is the business Id
- Name - Name of the business
- Created - The date the business was created
- Billing plan - I.e standard/plus plan
- External Id - If there is an external Id listed on the Payroll settings > Details page
- Email addresses - Lists any full access user within the business. These are the users listed on the Payroll settings > Manage users page
- Incomplete employees - Employees that have been added to the business but their details are incomplete.
- Complete employees - This includes all complete employees, including terminated employees.
- Last Billable Pay Run Date - This refers to the date/time that the last billable pay run was finalised. The time here represents the Default time zone as set on the 'Details' page of the dashboard.

You are able to download this report to CSV format, and this will provide the following additional fields:
- RealmId - This field is only used for QuickBooks businesses.
- User Ids - This is the unique Id that is assigned to each user.
Active employees report
In addition to the date and 'ignore emails' filters, the 'Active employees' report also has a check box to ‘include inactive businesses'. This means that you can include/exclude any business that doesn't have any paid employees within the specified date range:
When you run the report, the system will show the following columns:
- Id - This is the business Id
- Name - Name of the business
- Business number - The business ABN/WPN
- Billing plan - I.e standard/plus plan
- STP enabled (AU region only) - Whether or not the business is STP enabled
- Email addresses - Lists any full access user within the business. These are the users listed on the Payroll settings > Manage users page
- Active employees - Is the number of employees who:
- has had a timesheet approved
- has had a roster shift published
- has had a leave request approved
- has had an expense request approved
- has been included in a finalised pay run
Any employee who meets any one of the billing criteria will be considered active and will therefore be included in the total number of employees billed.
- Pay runs processed - Is the number of finalised pay runs within a business
- Last billable activity - This refers to the date/time that the last billable activity was performed. The time here represents the Default time zone as set on the 'Details' page of the dashboard.

You are able to download this report to XLSX or CSV format, and this will provide the following additional fields:
- Date the business was created
- Incomplete employees
- Complete employees
Feature usage report
The feature usage report allows partners and brand users to download data relating to feature usage at the brand level. This can be done at a business level via the Partner Dashboard > Business maintenance section.
The report can be filtered by the following:
- Feature: Select one or more specific features from a predetermined list, or alternatively leave it at the default value of ‘all’;
- Business: Select a specific business (using either business using name or ID) to run the report for;
- Billing plan: Select a specific plan relating to the brand, or alternatively leave it at the default value of 'all';
- Checkbox for ‘exclude inactive businesses': By default, all businesses are included, however you can tick this box which will exclude businesses that are yet to be billed.
The features that will be reported on include the following:
- STP enabled (AU region)
- Pay run automation
- Payment files
- Chart of accounts
- Onboarding
- WorkZone
- Report packs
- Qualifications
- Time and attendance
- Rostering
- Awards (AU region)
- Custom rule sets
- Super clearing house
- Payroll admins
The feature usage report can only be downloaded via excel.
Business templates
This section allows you to access a consolidated list of all business templates set up for the brand. This article provides detailed information on business templates.
The following information/actions will be shown in relation to existing business templates:
- Template Name - the value entered in the "Name" field for that template
- Description - the value entered in the "Description" field for that template
- Brand default - the value entered in the "Apply by default for all new businesses created under brand" field for that template
- 'Default' tag - A 'default' tag will be shown against the template that has been selected to apply by default to all new businesses that are added.
- Open business settings
- Clicking this action will open a new page and will redirect you to the business maintenance settings which is explained further in this article.
- Open in payroll platform
- Clicking this action will open a new page and will redirect you to the actual business file within the system.
If there are no templates set up for the brand, the message ''There are no business templates set up for this brand" will be displayed.
Brand management
Detailed information regarding the brand management page can be found in this article.
Security
There are 2 tabs on this page that both brand and partner level users will see:
- Manage users
- Manage 2FA
Manage users
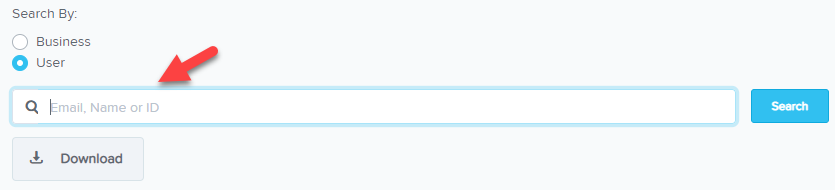
There are a few functions that can be performed on this page. Firstly, you are able to search using the following filter options:
- Business
- User
If you choose to do this, you'll need to enter either the email, name or ID into the search field here:
You can then download an excel file to view more detailed information on the search data.
Below the search field is a list of users that have access to the business. It's important to note here that this could include users that have business level access (i.e. users that have access to only specific businesses), and brand/partner users. In regards to brand/partner users, they don’t require explicit business access because their access is implied stemming from their brand/partner access. As the security page is intended as a business level function, there are some differences between users when performing the manage/revoke tasks as highlighted below:
![]()
- Manage user access (the 'pencil' icon) - Selecting this option will take you straight to the 'manage users' page of the business. This will happen even if the user isn’t actually a user directly linked to the business. E.g. a brand user might have implicit access only but if you click the ‘edit’ option you will still be taken to the business file > manage users page.

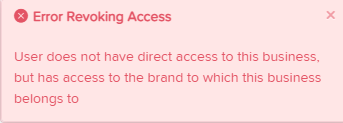
- Revoke user access (the 'bin' icon) - You'll be able to revoke users who have business level access using this option (i.e. those users who are listed on the 'manage users' page of the business). If you want to revoke a user who has brand access, you’ll need to go to the User Access screen to remove them. The below warning will appear if you try to revoke their access from the 'security' page:
If it’s a partner and you want to remove them completely (and you have partner level access), the support team will need to do it, therefore, you'll need to contact us on support@yourpayroll.com.au
Manage two-factor authentication
In relation to full access/reporting level users two-factor authentication is mandatory and cannot be disabled.
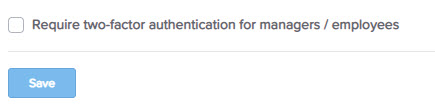
In relation to managers/employee level users, it is optional and you are able to specify that two-factor authentication be required for managers / employee level access users. This cannot be overridden at an individual business level.
If you want to turn 2FA on for managers/employee level users, you need to tick the box that says 'require two-factor authentication for managers / employees':
Further information on 2FA can be found in our support article. Choose the relevant region: AU | NZ | SG | UK.
Email sender authentication
You are able to set up DKIM (DomainKeys Identified Mail) on a domain of your choice for emails sent via the platform from an address nominated by you, (such as pay slip notifications, leave or expense requests, report packs). This is to ensure that mail servers that receive these emails don’t think we are trying to spoof your emails because we are pretending to be you, and so won’t put the emails in the recipient’s Spam/Junk folders. Eg. if the domain for your company was mybusiness.com.au, and we sent pay slip notifications to your employees with a From Address of payman@mybusiness.com.au, receiving mail servers will not believe that the incoming emails were from you as they can easily see that they were from us, and so will mark the emails as spam. To avoid this issue we can sign the emails with DKIM.
You are able to make this change at a brand level, which will apply to all businesses under the brand. If you want to configure this at a per business level, you'll need to log into the individual business in order to make the change.
Instructions on how to set up DKIM authentication
To set up DKIM authentication:
- Go to Brand management -> Email Sender Authentication.
- Click on the 'add a new DKIM authentication now?' link:

- Enter in the domain you wish to authenticate.

- Click Register
- The system should generate a set of CNAME records that you will need to add to your DNS settings. You'll need to contact your IT dept or web admin for further assistance on adding these records if required.

- Add the DNS records to your DNS registry - This happens within your DNS host settings. You'll need to contact your IT dept or web admin for further assistance if required.
- Once you've done that, come back to Brand management -> Email sender authentication, click the 'unvalidate' button for your domain.
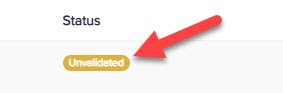
- If you've created the records correctly, the domain will be Validated.
Once your domain has been Validated, any email we send for you on your behalf that uses that domain as the From Address will be signed with DKIM, and will have a very good chance of being delivered to recipient's Inboxes.
N.B. In order to set up DKIM authentication, you need access to the domain's DNS settings. For this reason, you are not able to follow this process for restricted email domains (e.g. Yahoo, Gmail) because in those cases, you don't have access to the DNS settings.
Setting up DKIM Email Authentication requires you to make changes in your Payroll settings and your DNS host.
When a customer wants to move away from your brand
Standard practice in these circumstances:
- where a payroll account is to be moved out from under a partner brand to become a "stand alone" account
- where a payroll account is to be disconnected from a QuickBooks account and moved to your brand (NB. once this is done the pay run journals can still be sent to the QBO account, you will connect to QBO via the Journals page, under the business management heading on the payroll settings tab)
- where a payroll account is to be moved from one brand partner to another brand partner
is for written/email permission to be granted:
- by the relevant brand access user/s (if QBO are involved a payroll champion must manage their side of the process)
- by the business owner/full access user, whose payroll is managed in the account
This is done to ensure that everyone involved knows what's happening - after all, once the change is made, the business owner will at the very least need to know that they will login to their payroll account from a different URL.
A few points for you to confirm with the business owner..
- only a full access user from the business can make this request to you, and then you provide it to us - check access on the Manage Users page, under the business management heading on the payroll settings tab on the payroll dashboard.
- Direct debit to a valid Visa or Mastercard are the only payment options available for payroll once the account is moved away from your brand - the customer should be informed that they will need to enter credit card details onto the subscription page (under the business management heading on the payroll settings tab on the payroll dashboard) once the transfer is done - click on this link for information about our retail pricing... https://keypay.com.au/pricing
- once disconnected it's exactly the same payroll account as they have been using all along, they'll just access it "directly".
Once the account is moved brand users will not have access to the payroll account unless the customer provides explicit access on the Manage Users page.
As for billing - whoever is responsible for billing as at the point in time when the invoice is generated, on the 1st of each month, is who will be billed - meaning if the account is moved away from your brand in July then the customer will be billed for July in our invoice dated 1 August. If the charges needs to be pro-rata'd / separated you'll have to arrange that outside of payroll.
Pension settings (UK only)
This is relevant to UK only, and allows you to associate a PensionSync id with the brand.
Please reach out to us should you have any questions or concerns support@yourpayroll.com.au