![Pay Cat Logo New 2.png]](https://www.paycat.com.au/hs-fs/hubfs/Pay%20Cat%20Logo%20New%202.png?height=50&name=Pay%20Cat%20Logo%20New%202.png)
An SSL certificate is a digital certificate that authenticates a website's identity and enables an encrypted connection. They are what enable websites to move from HTTP to HTTPS, which is more secure.
This article covers the following topics:
- Who needs an SSL certificate?
- Why do you need an SSL certificate?
- How do you know whether your brand/s are secured?
- Setting up an SSL certificate
- Changing a host name
Who needs an SSL certificate?
Brands with custom domains will need an SSL certificate.
NB Brands with a host name covered by a wildcard DNS will not need to set up SSL because the host name will be covered by the SSL certificate for the higher level domain.
What is a wildcard domain?
The simplest example of brand wildcard domains are brands that use our Employment Hero Payroll domain. Another example could be:
A partner 'Simple Payroll Solutions', has its domain with a wildcard DNS set up like *.pays.com.au. It then sets up brands with a host name covered by that wildcard, for instance:
bobspayroll.pays.com.au
simplepayroll.pays.com.au
Why do you need an SSL certificate?
Partners who want to use a custom domain for their payroll brand/s need to secure the domain (i.e. the host name). The intention for this is that when payroll users open the domain in a web browser, they can use the custom domain (e.g. barbspayroll.pays.com.au) instead of *.yourpayroll.com.au.
How do you know whether your brand/s are secured?
When creating a brand, the system will analyse the host name to determine if we have a covering certificate for it.
NB: In the instance that we have a wildcard domain (eg: *.yourpayroll.com.au), no further action is required to secure the host name.
Partner admins will be able to see at a glance on the brand management screen whether existing/created brand domains are secured, not yet secured or in the process of being secured:
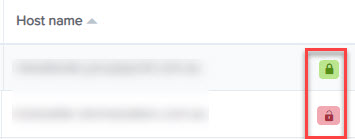
The icon colour and hover text will indicate and clarify the status as follows:
- Red: No SSL certificate;
- Blue: Pending domain ownership verification OR Pending payroll connection verification
- Green: Domain secured
On the Partner dashboard > Brands > Details page, you'll also be able to check whether the host name or alias is secured by the presence of a green confirmation tag to the right of the domain field as shown below:

If there is no certificate, the label will be red and labelled 'No SSL certificate':

Setting up an SSL certificate
In the past, to be able to use a custom domain for a payroll brand/s, both us and the user had to perform a range of back and forth manual tasks which resulted in the process being prone to error and time-consuming. In addition, there were often cases where the user forgot to renew their SSL certificate, leading to an interruption in service.
Using AWS Certificate Manager, partner admins are now able to manage SSL certificates in a simple, fast and reliable process, both for existing brands and when creating a new one.
There are 3 steps to the process:
- Request an SSL certificate
- Verify domain ownership
- Verify the payroll connection
Below are instructions for setting up an SSL certificate depending on whether it's for a new or existing brand.
SSL certificates for a new brand
When creating a brand, the host name will be analysed to determine if we have a covering certificate for it. If not, a message will be displayed to the user to indicate that the certificate process will need to be followed after creation:
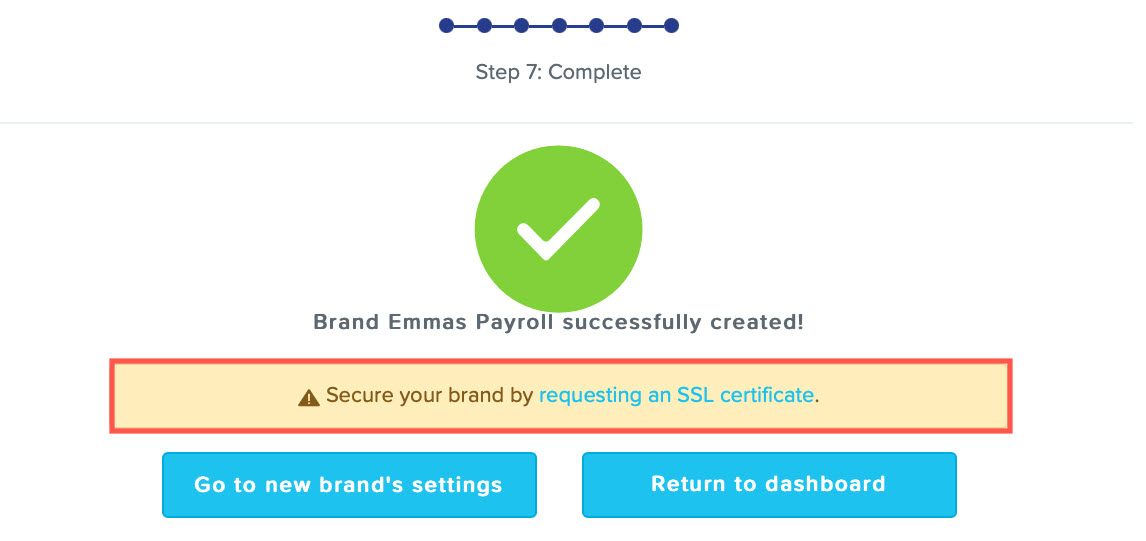
In the above scenario, after you create the brand, you can then go into the Partner dashboard > Details page and follow the below procedure for setting up a SSL certificate for an existing brand.
SSL certificate for an existing brand
Step 1 – Request an SSL certificate
On the brand details screen, each host name / alias will have a label next to it to indicate whether it is secured or not:

Clicking on the red label will bring up a side panel allowing the user to request an SSL certificate:
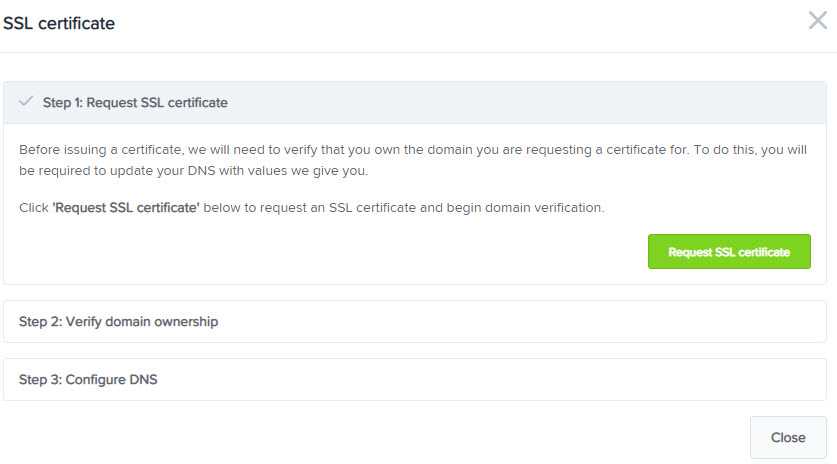
Clicking ‘Request SSL certificate’ will locate a free slot on a load balancer and begin the certificate process for the domain.
If there is no room on the load balancers, you'll get the following warning:
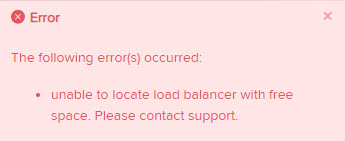
In the above scenario, you will need to contact the support team in order to create a free slot so you can proceed.
Once the certificate has been successfully requested, a confirmation message will display and the user will be automatically moved to step 2.
On the brand details screen, the status label will change to ‘Verify domain ownership’. To reopen the context panel again, click on this label and the panel will open at the next step.
Step 2 – Verify domain ownership
The next step is to verify the domain ownership. This involves configuring the specified DNS entries, so that AWS can confirm that the user has access to configure the domain, and then verifying.
Configure DNS entries
You'll need to use your relevant DNS settings tool to configure the DNS entries.
Two CNAME records will be generated which need to be added to the DNS settings for the host name:
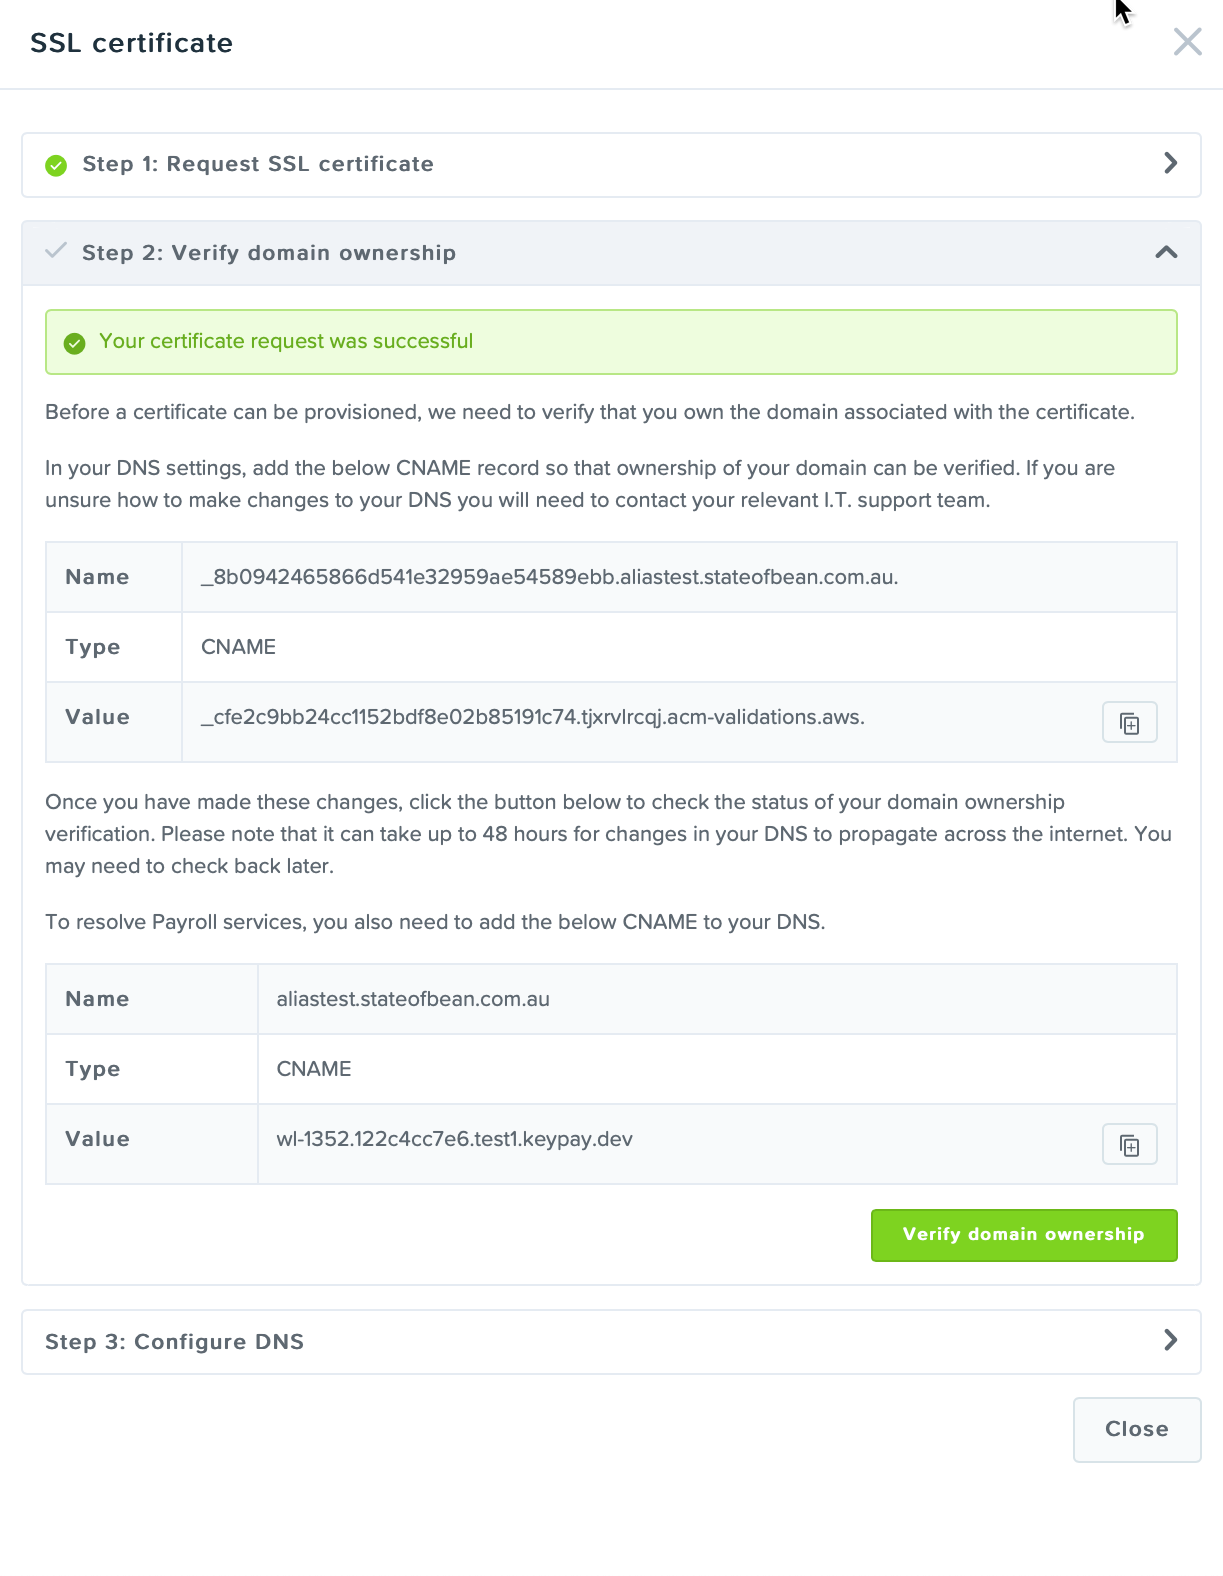
The first record is required to verify domain ownership and the second record is required to verify the payroll connection. Both records are provided at this stage as typically these will be added at the same time.
Each CNAME record contains the following fields:
- name
- type (this will always be CNAME) and
- value.
Depending on your particular DNS setting interface, all or part of the name record may be required. However, the full value field will always be required – to make it easier to copy this information to the DNS settings and avoid potential errors, a ‘Copy to clipboard’ button is displayed next on the value field for each record. This allows you to copy directly to your DNS settings or forward to your IT team.
Contact your IT support team for assistance with DNS settings.
Verify domain ownership
Once the DNS records are configured, on the context panel, click ‘Verify domain ownership’.
If the records have not yet populated, or if the DNS record has been incorrectly entered, an alert will display, ‘Not yet verified’. Try again later and if still unsuccessful, check that your DNS settings are correct. NB: The CNAME records will continue to display until verified.
The status will be updated in the brand details to a blue label to indicate that it's pending.
Once verified, a confirmation message will display, ‘Domain verification complete’, and you will automatically move to the next step.
On the brand details screen, the status label will change to ‘Verify payroll services’. Clicking on the label will reopen the context panel at the next step.
Step 3 – Verify the payroll connection
The second CNAME record, to verify the payroll connection, will display again in case you still need to add that to your DNS settings.
Once the CNAME record has been added, click the ‘Verify payroll connection’ button.
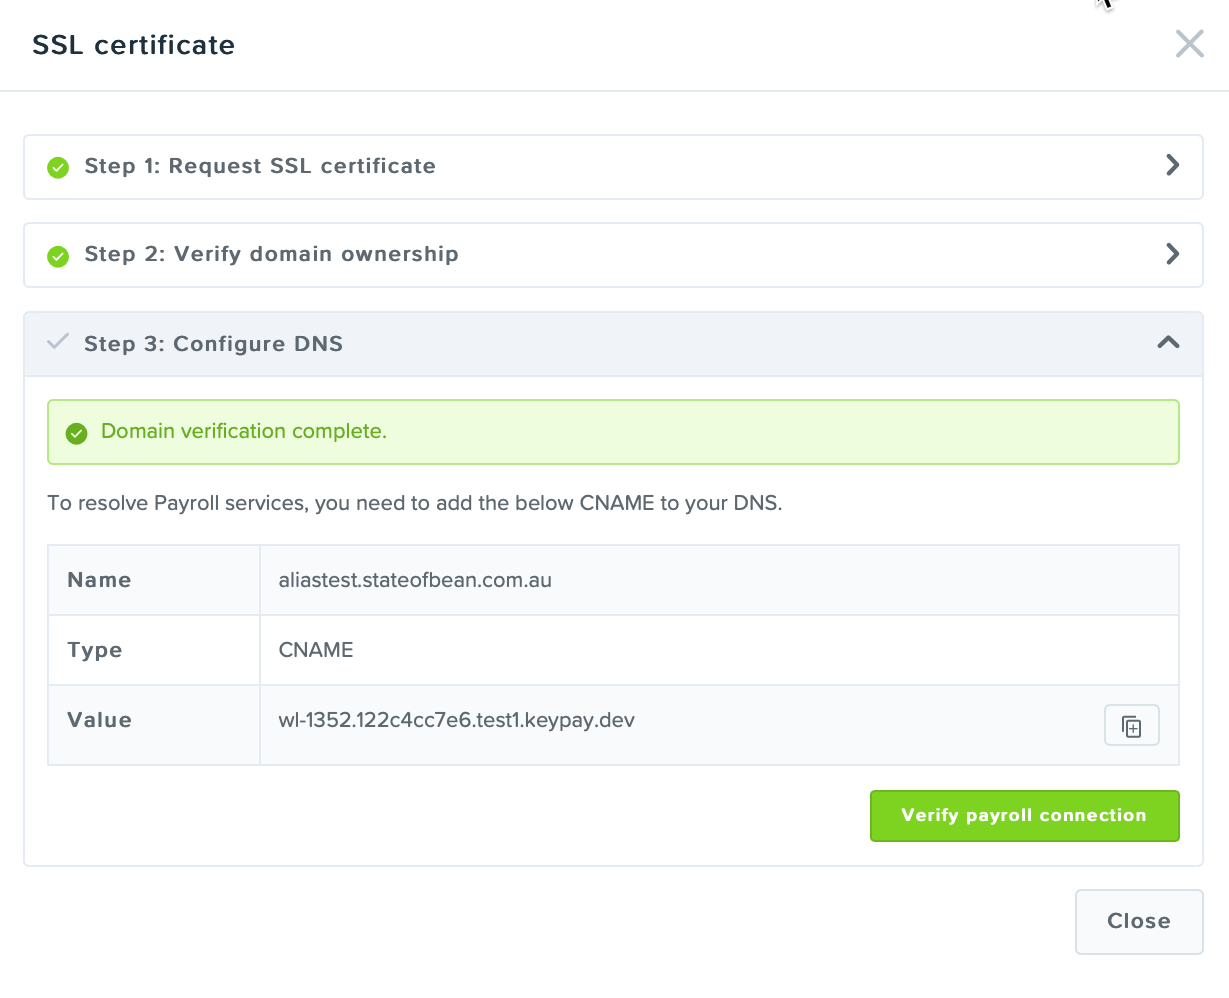
If the records have not yet populated, or if the DNS record has been incorrectly entered, an alert will display, ‘Unable to resolve payroll services’. Try again later and if still unsuccessful, check that your DNS settings are correct. NB: The second CNAME record will continue to display until verified.
Once the payroll connection is verified, the context panel will display each step with a green tick.
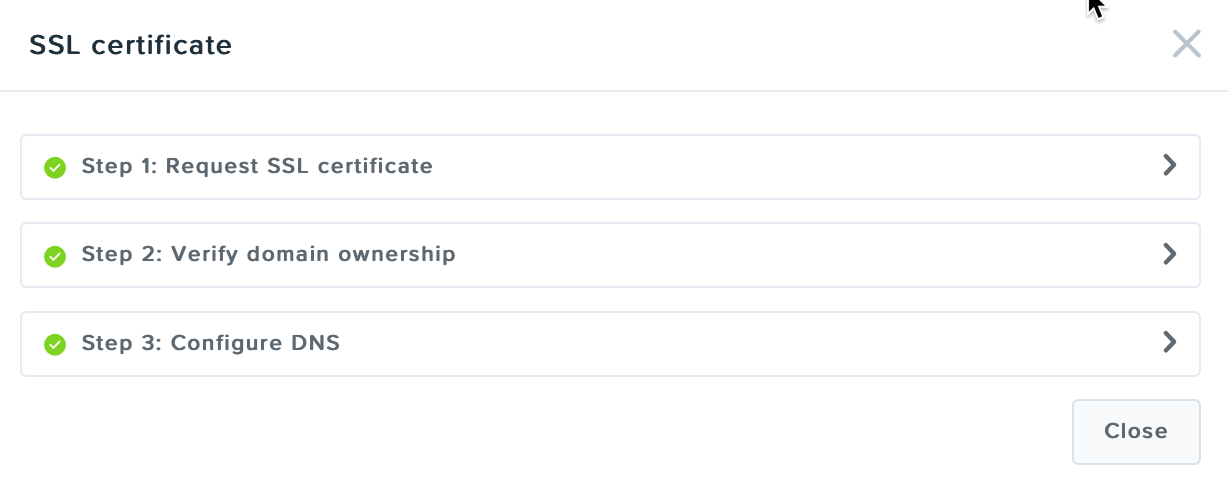
You can then close the context panel and return to the details page.
Process complete
On the brand details page, the status label will change to ‘SSL setup complete’ for the host name and/or alias:

Clicking on the label will reopen the context panel and display each step as completed.
Users can now access payroll via their custom host name.
Changing a host name
If you need to change a host name, you can do this by clicking into the 'Host name' or 'Alias' field and entering the new host name. When you click ‘Save’, the status label will change to ‘No SSL certificate’ and you will need to go through the process again.
If you have any questions or feedback, please let us know via support@yourpayroll.com.au