![Pay Cat Logo New 2.png]](https://www.paycat.com.au/hs-fs/hubfs/Pay%20Cat%20Logo%20New%202.png?height=50&name=Pay%20Cat%20Logo%20New%202.png)
The first thing you need to do to start using deductions is to setup your deduction categories. This allows you to setup specific deduction categories which can be tailored to the needs of your business.
A short video on this setup can be found here.
Setting up a deduction category
- Go to Payroll settings > Deduction categories;
- You'll notice there are a number of default deduction categories that exist when creating a new business. Most settings within these default categories are not editable.
NB: The following system default categories will be available in businesses created after 18/2/2021:- Workplace giving (pre-tax)
- Workplace giving (post-tax)
- Union or professional association fees
- Child support deduction
- Child support garnishee.
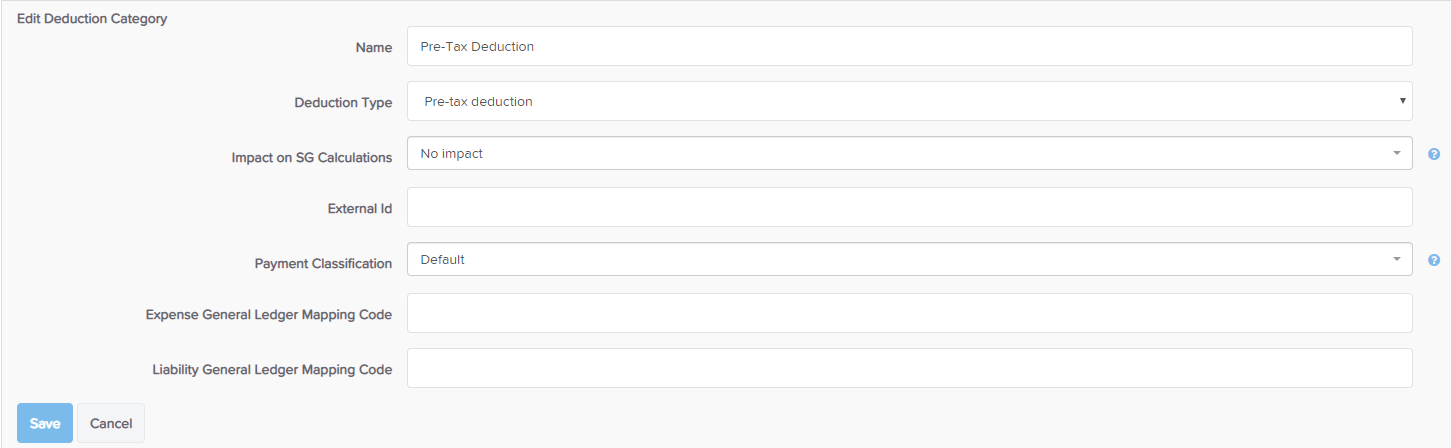
- To edit a deduction category you can click on the name of the category (fields highlighted grey are not editable);
- In order to add a new deduction category click the 'Add' button in the top right corner, and enter a name for the deduction category. Select whether it will be a pre or post-tax deduction and use the other settings there if required before clicking save.
- External Id: If an external id is used that has been used before you won't be able to save it if the 'unique external Id' setting is switched on. This setting is located on the Payroll settings > Advanced settings page. See here for more information.
Once you have set up your deduction categories they will now be available to be assigned to employees.
Setting up a recurring deduction
If you are needing to set up a deduction that recurs indefinitely:
- Go to the employee record for the employee that you want to create the recurring deduction for and under the 'Pay run settings' section click 'Pay run inclusions'
- You will then be taken to the following screen:
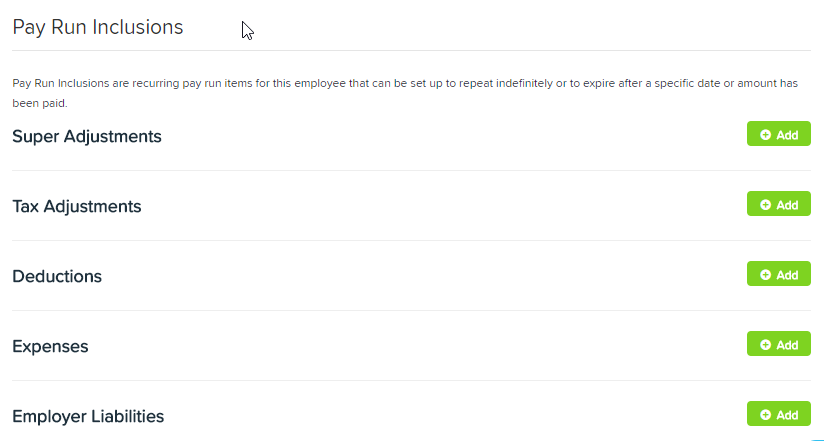
- Click on 'Add' on the right side of 'Deductions' and complete the required details. More information on different deductions are found below.
Setting up a recurring deduction - salary sacrifice super
- Click on 'Add'.
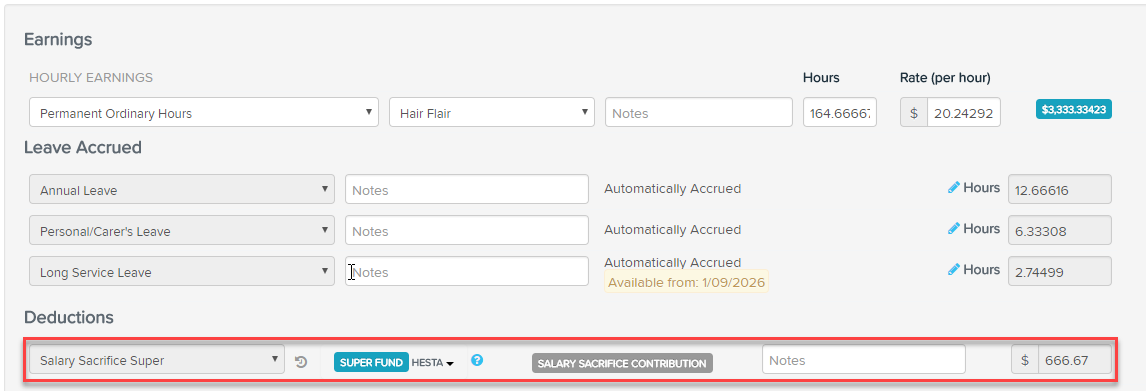
- Select the 'Salary sacrifice super' deduction category from the drop down list.
- Enter the deduction amount to be applied per pay run. It can be a Fixed amount, a Percentage of Gross earnings or Percentage of OTE.
- This deduction will automatically point the payments directly to a super fund, so you'll just need to select the correct super fund from the drop down list.
- Select whether you want to apply preserved earnings to this deduction. Refer below on detailed information relating to preserved earnings.
- Enter any notes if you want the employee to see them on their pay slip.
- Enter the date this inclusion is to commence.
- Choose when this inclusion should cease (a specific end date, never or once a particular dollar amount has been reached).
- Click on 'Save'.
NB - More information on deductions relating to salary sacrifice can be found here
Setting up a recurring deduction - not salary sacrifice super
- Click on 'Add'.
- Select the appropriate deduction category from the drop down list.
- Enter the deduction amount to be applied per pay run. It can be a Fixed amount, a Percentage of Gross earnings or Percentage of OTE.
- Select whether the deduction should be paid manually, to a super fund, a bank account or via a BPAY account. To pay this deduction directly into another bank account, via the ABA file from the pay run, you'll need to have first set up the bank account on the employee's record / bank accounts page (set the amount to pay as Fixed and $0) so you can choose this bank account from the drop down list and you can add a 'reference' in the Payment Reference field. Additionally, to pay the deduction via a BPAY account, you'll need to have first set up the BPAY account on the employee's bank accounts page (set the amount to pay as Fixed and $0) so you can choose this BPAY account from the drop down list.
N.B. In regards to journal mapping, if you set up a deduction to be paid direct to a bank account, it is not considered a liability (because it's already been paid over) so it will go to payroll clearing. If you want the journal entry to be a debit not a credit use an Expense account in the chart of accounts. - Select whether you want to apply preserved earnings to this deduction. Refer below on detailed information relating to preserved earnings.
- Enter any notes if you want the employee to see them on their pay slip.
- Enter the date this inclusion is to commence.
- Choose when this inclusion should cease (a specific end date, never or once a particular dollar amount has been reached).
- Click Save
Setting up a recurring deduction - Child support deductions
More information on setting up child support deductions and STP reporting can be found here.
Setting up a recurring deduction - Workplace giving and Union or professional association fees
- Click on 'Add'.
- Select the appropriate deduction category from the drop down list. For STP reporting purposes you will need to ensure that the deduction category being used has the correct workplace giving / union or professional fees classification in the deduction set up (for new businesses created on or after 18 February 2021 you will find that we have added the system deduction for you. For businesses created before the 18 February 2021 you will need to set up a deduction or use one you had previously set up).
- Enter the deduction amount to be applied per pay run. It can be a Fixed amount, a Percentage of Gross earnings or Percentage of OTE.
- Select whether the deduction should be paid manually or to a bank account. To pay this deduction directly into another bank account, via the ABA file from the pay run, you'll need to have first set up the bank account on the employee's record / bank accounts page (set the amount to pay as Fixed and $0) so you can choose this bank account from the drop down list and you can add a 'reference' in the Payment Reference field.
- Select whether you want to apply preserved earnings to this deduction. Refer below on detailed information relating to preserved earnings.
- Enter any notes if you want the employee to see them on their pay slip.
- Enter the date this inclusion is to commence.
- Choose when this inclusion should cease (a specific end date, never or once a particular dollar amount has been reached).
- Click Save
Now, the next time you process pay run that includes this employee, the deduction will automatically appear:
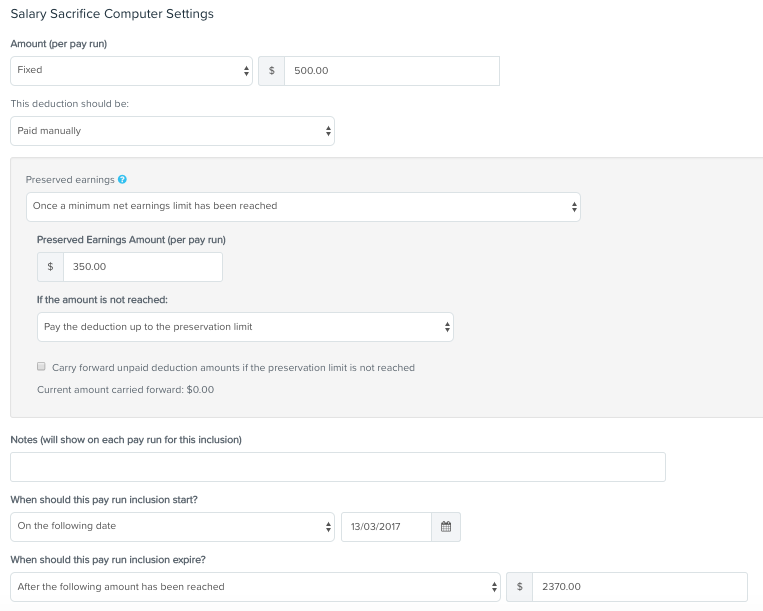
Preserved earnings is defined as the minimum net earnings an employee MUST be paid before a deduction amount can be applied in the pay run. For example, an employee could have a garnishee order but part of the order includes that the employee's net pay cannot be reduced to less than $300 per week as a result of the garnishee order. To set this up of example, you would:
(a) Preserved earnings: select 'Once a minimum net earnings limit has been reached';
(b) Preserved earnings amount: enter 350;
(c) If the amount is not reached: here you can choose to have none or only part of the deduction amount processed in the pay run;
(d) Carry forward unpaid deduction amounts: here you can choose whether or not you want any unpaid deduction amounts to be carried over to following pay runs. For example, say an employee’s recurring deduction amount was fixed at $100 per pay run but only $50 was deducted in the pay run. If you choose to carry forward the unpaid deduction amount, the unpaid $50 will be carried over and a total of $150 will be deducted in the following pay run. If you choose not to carry it over, the unpaid $50 deduction amount will be disregarded and in the following pay run only the recurring $100 will be deducted.
(e) Carry forward unused preserved earnings: here you can choose whether or not you want any preserved earnings that are paid below the preserved earnings carried forward. For example, an employee has preserved earnings set at $300. In one pay run the employee is only paid $200 in net earnings. If this setting is ticked, the difference of $100 will be carried over so that the preserved earnings for the next pay run will be $400.
An example of a Deduction paid to a super fund that includes preserved earnings is as follows:
An example of a Deduction paid to a bank account without preserved earnings is as follows:

Checking the status of a deduction
You can quickly see the status of expiring deductions by coming back to the employee Pay Run Inclusions screen.

Once you’ve setup your deductions, a summary of the deductions will be displayed which will include:
- The amount or date at which the deduction will expire
- The start date of the deductions
- Whether or not the deduction has actually expired
- For amount based deductions, the current amount that has been paid
- The payment type setup for this deduction
N.B. A deduction expiry date means "will not be included in pay runs where the pay period starts after this date" and NOT the date paid.
Restoring a deleted deduction
If you need to restore a deduction that you've previously deleted, you can do this by going to the Payroll settings > Restored deleted items page, and selecting 'Deduction category' from the drop down list. A list of all deleted deductions will appear and you can click the 'Restore' option against the deduction that you are wanting to reinstate.
If you have any questions or feedback, please let us know via support@yourpayroll.com.au