![Pay Cat Logo New 2.png]](https://www.paycat.com.au/hs-fs/hubfs/Pay%20Cat%20Logo%20New%202.png?height=50&name=Pay%20Cat%20Logo%20New%202.png)
This article will guide you through completing your end of year processing (ie processing a finalisation declaration) using the STP EOFY Wizard. This article should be read in conjunction with the STP EOFY Guide.
Before proceeding, be aware that the STP EOFY Wizard is NOT the only method you can use to lodge your finalisation event. You can also fulfil your end of year processing obligations by creating and lodging an update event. The STP EOFY Wizard does, however, include additional functionality over an update event, being:
- The ability to bulk import reportable fringe benefit amounts for employees;
- Sending notification emails from the platform once the finalisation event has been successfully lodged;
- The option to process an event encompassing all pay schedules, as opposed to creating an event for each individual pay schedule. This functionality is restricted to businesses with less than 2000 active employees;
- Auto-calculating any variances between STP reported earnings vs earnings processed in finalised pay runs as part of your reconciliation process; and
- Accessing the amended finalisation event wizard if further finalisation events are required.
N.B. Businesses that have not reported EVERY pay run in the FY to the ATO should first lodge an update event prior to commencing the finalisation event. We strongly suggest this to ensure ALL employees paid in the FY are captured and reported prior to finalising the FY process.
Accessing the STP EOFY Wizard
It is important to note that you cannot lodge a finalisation event if you have not successfully reported any pay events during the FY. This will result in a failed lodgement. So, before proceeding with a finalisation event, ensure you at least lodge your last pay run for the financial year. Once that has been successfully lodged, you can commence the process as per the instructions below.
To activate the wizard, go to Reporting > Single Touch Payroll > then click on 'Start finalisation process'.
Step 1: Select Pay Schedule
Select the financial year you want to finalise. And then select the pay schedule you want to create the event for. You can choose to:
- create an event per pay schedule (by selecting the specific pay schedule); or
- create one event that encompasses all pay schedules (by selecting the 'All pay schedules' option). This option is only visible/available to businesses with less than 2000 active employees at the time of creating the finalisation event.
Clicking on 'Cancel' will exit you from the wizard and not save the event. Clicking on 'Next' will take you to the next step.
Take note of the following rules around selecting pay schedules:
- If an employee has been paid via multiple pay schedules throughout the financial year, you do not have to complete a finalisation event for each pay schedule. Rather, you only need to complete the finalisation event for the pay schedule the employee is assigned to at the time of creating the finalisation event. For eg, an employee's default pay schedule is the 'Monthly' pay schedule - they have also, however, been paid in an 'Adhoc' pay schedule throughout the year. As the employee's default pay schedule is 'Monthly', all the employee's YTD earnings will be reported in the 'Monthly' finalisation event.
- Once you create a finalisation event for a specific pay schedule, you cannot create another finalisation event for that same pay schedule. A message will appear on the screen stating as such:

- Rather, you will need to create an amended finalisation event.
- Similarly to 2 above, once you create a finalisation event for all pay schedules, you cannot then create a finalisation event for a specific pay schedule. Rather, you will need to create an amended finalisation event for that specific pay schedule (or you can choose all pay schedules).
Step 2: Confirm Payroll Data
This step allows the user to:
- ensure the YTD earnings are correct (the finalisation event will show the YTD totals at the bottom of each column for only the employees that were included in the finalisation event);
- reconcile the YTD earnings in the event with the payroll reports; and
- rectify any validation issues prior to lodging (to avoid a failed lodgement).
The employees that will appear in the finalisation event are all employees paid in the financial year who have not previously been marked as 'is final' in an earlier event. You will also note that the 'Is Final' checkbox is ticked by default and is not editable. This is intentional as the purpose of the finalisation event is to indicate to the ATO that no further payments are to be made to employees in this financial year, which is identified from the 'Is Final' checkbox.
From this screen, you can access an excel spreadsheet of the payroll data being reported in the event. To download the document, click on Download > Excel.
To access a year to date report that includes payroll data for ALL employees who have had events successfully lodged with the ATO use the 'Excel (YTD)' report. This report will include any employees that had previously been marked as final during the financial year (and did not appear in the finalisation event). N.B. If an employee's pay has not been successfully lodged with the ATO during the financial year, it will not appear in the report.
Additionally, you may notice some warnings on the screen, as follows:
The warning will also contain a link to our support article detailing all potential validation warnings. The article can also be found here. All warnings must be rectified before you can proceed to the next step. Once fixed, you can refresh the data in this step by clicking on Actions > Refresh Data. Once all warnings have disappeared you can proceed to the next step.
Clicking on 'Back' will take you to the previous screen, whilst clicking on 'Save for later' will exit you from the Wizard and save the details of the previous screen.
Step 3: Enter Reportable Fringe Benefits
This step is only applicable if you have employees with reportable FBT amounts that need to be entered. If this is not the case, you can click on 'Next' to proceed to the next step.
If this is applicable, there are 2 ways of entering FBT amounts:
- You can enter the amount manually for each employee by clicking on the edit pencil under 'RFB Amount', enter the grossed up amount and then click on Save button.
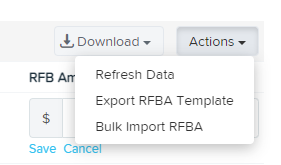
- You can bulk import FBT amounts for all or a bulk of employees. To do this-
- click on Actions > Export RFBA Template.
This document will contain ALL employees attached to the pay schedule (this includes employees that may not appear in the finalisation event so take care when entering the required amounts. The employees that are not in the finalisation event can remain in the excel doc as long as they have 0 RFBA);
- you can enter all the relevant grossed-up amounts against each applicable employee;
- once you have saved the data go back to the finalisation event and click on Actions > Bulk Import RFBA > select the file you just entered the amounts into > confirm upload;
- all amounts will import and appear against each of the relevant employees. If you have tried to import amounts for employees that were not included in the finalisation event you will receive the below warning. If you still do need to import fringe benefits amounts for these employees you will need to do so via an amended finalisation event. 
Please take note of the following:
- If the business has multiple pay schedules, there will be separate worksheets for each pay schedule and the employees will be listed in their relevant worksheet (based on their pay schedule).
- You must only enter the grossed-up taxable value of these benefits;
- Do not enter any cents in the amounts; and
- Do not include any FBT amounts in the employee's gross earnings;
- Import the template on a per pay schedule basis for each finalisation event; and
- The amount entered must be the YTD amount. If any amounts have previously been entered in other events, the amount will be included in the export. If you need to update an employee's YTD amount enter the actual YTD amount in the field so that it overrides the existing amount, ie the amount added here will not be in addition to the existing amount showing for the employee.
You may need to seek advice on which FBT deductions are reportable. Further information on FBT can be found here.
Step 4: Enter Foreign Tax Paid
This step will only display for a business with employees whose STP income type classification is foreign employment income (FEI) and the business is reporting via STP Phase 2.
Businesses who employ employees that work overseas and are classified as FEI for STP purposes must pay (or be liable to pay) the foreign government for the tax to qualify as FEI. On finalisation, the foreign tax paid (or liable to be paid) must be reported against the employee in order to proceed with the finalisation event. If no tax is entered and you click on "Next", you will be prevented from proceeding to the next step as the following validation will appear:
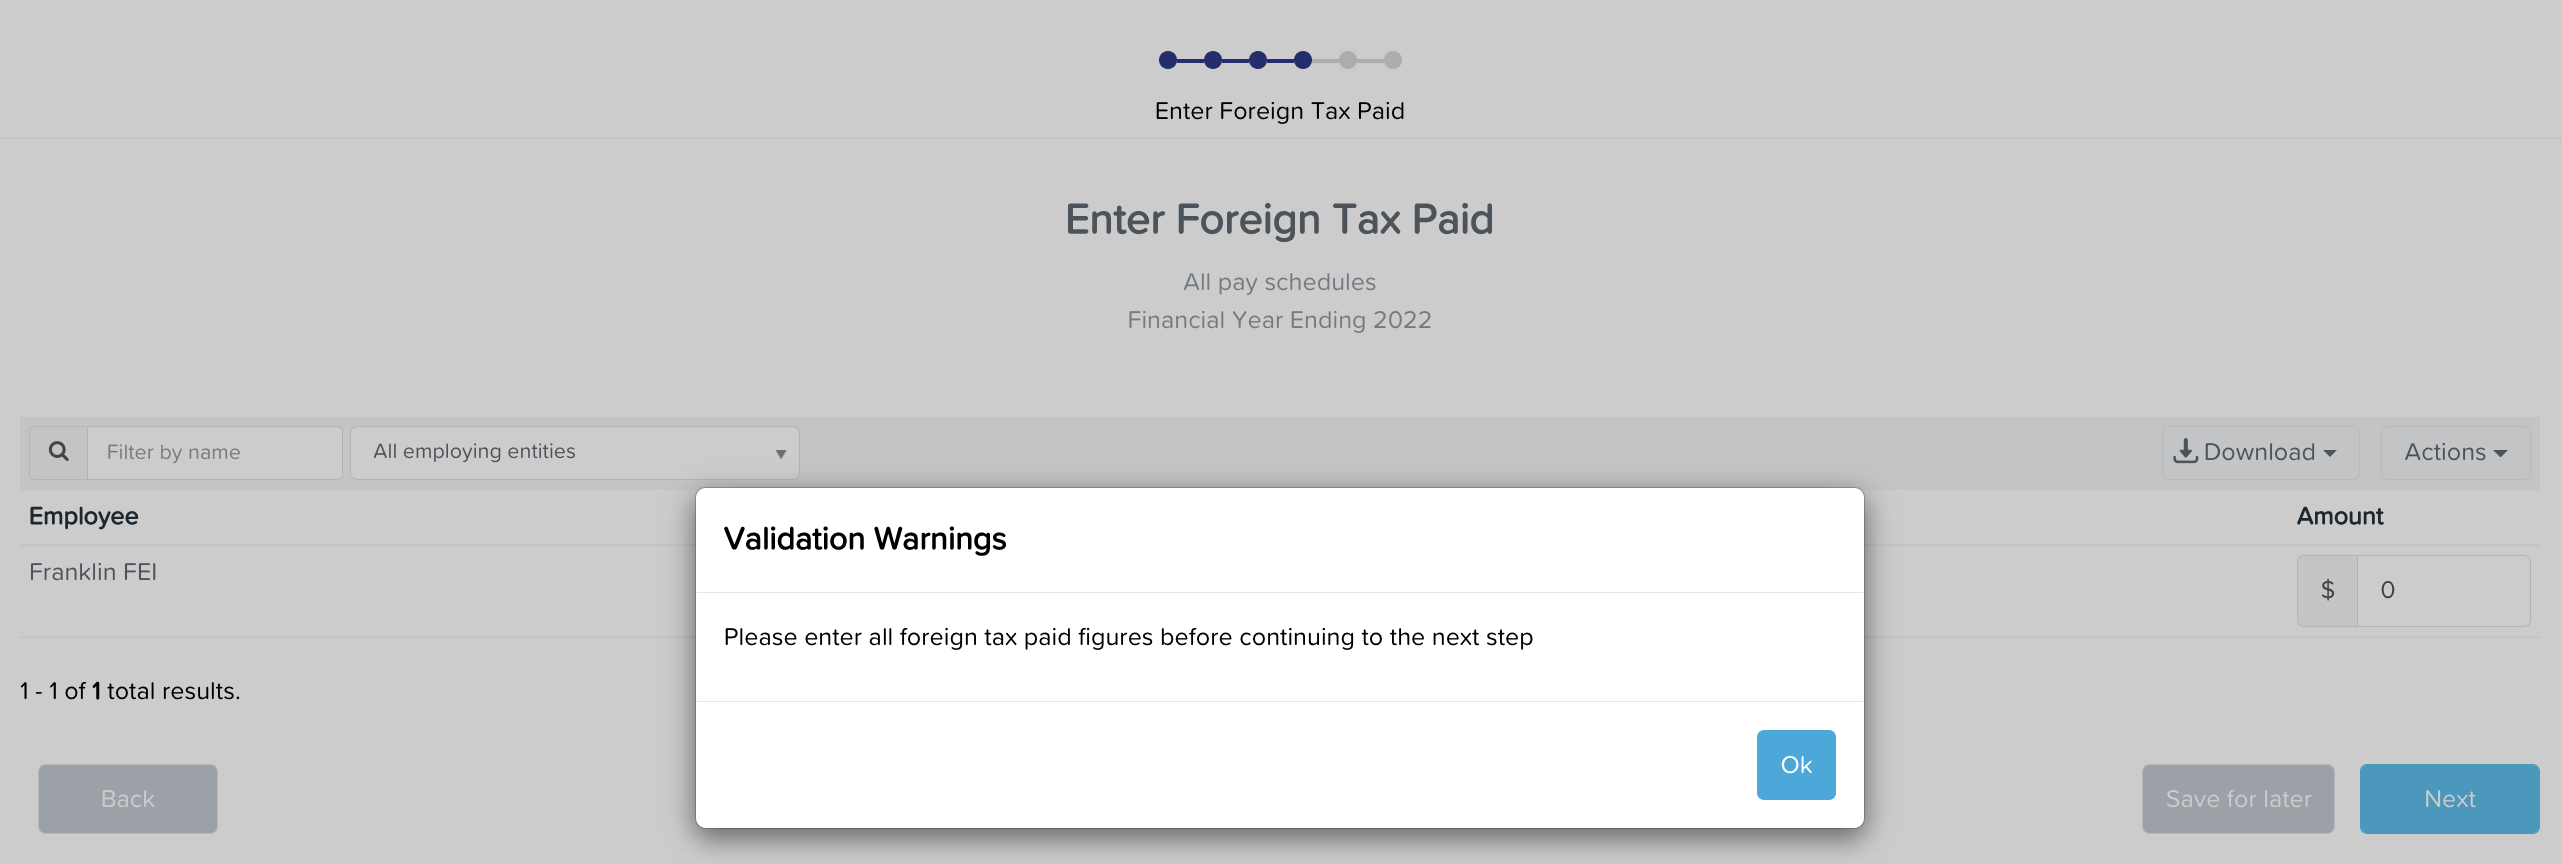
At this stage, you must either enter the foreign tax amount or, if there is no foreign tax to be paid for the employee, the employee must not be classified as FEI. Rather, you will need to remove that STP income type classification (which is done via the employee's Pay Run Defaults screen) so that the employee can be re-classified with the income type of Salary & Wages.
For more details on foreign employment income, refer here.
Step 5(a): Request Client Authority
This option will only appear for businesses who have indicated that a registered tax/BAS agent will be lodging reports to the ATO (via the ATO Settings screen). If this is not the case, proceed to Step 5(b).
Existing STP users will be familiar with this step in seeking client approval of the event and attaching that approval prior to lodging the event. As per normal practice, one or more STP event approvers can be added here. We also suggest you add a note to indicate the event relates to a finalisation event. The users added to the list will be notified via email that there is a finalisation event waiting to be actioned.
At this stage, the user processing the finalisation event should click on 'Save for later' and wait to receive a confirmation email once the event has been actioned. A confirmation email will only be sent if the notification setting 'Email me when a pay event is approved or rejected' is ticked on the My Notifications screen.
Step 5(b): Lodge Finalisation Event
This section deals with the user's declaration at lodgement time. If the business is set up to require two-factor authentication before lodging the event to the ATO, the user will be asked to enter a verification code after clicking on 'Lodge finalisation event' and prior to the event being submitted to the ATO.
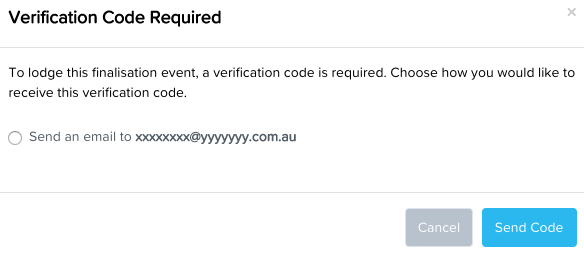
The user can choose to receive an email and/or sms or be verified via Google Authenticator (depending on their 2FA settings) and then click on 'Send Code'. Enter the code, when received, and click on 'Verify'. The finalisation event will then submit to the ATO.
At this stage, you have the option of returning to the payroll dashboard or to the actual finalisation event where you can keep track of the status of the event. If you have the notification setting 'Email me when there is a Lodgement error' switched on (via the My Notifications screen) you will be sent an email if there is an error with the lodgement.
Additional setting for tax/BAS agents
Before you are able to lodge the finalisation event, you must:
- select the 'Registered Tax Agent' option when choosing who is lodging, and
- assign the authority who has approved the event. Although it is possible to lodge the event while the selected authority’s status is showing as awaiting authorisation, for instance where a verbal authorisation is obtained, it is the responsibility of the registered agent to assign an approved client authority.
Step 6: Send Employee Notifications
Once the finalisation event has been successfully lodged with the ATO, you will have the ability to send system generated email notifications to the employees involved in that event. To do this, go into the event and click on Actions > Send Notifications.
The email contains the following text:
"Your income statement for [Employing Entity Name] for the financial year ending June 30, 2022 is now available.
You can access your income statement via ATO online services through your myGov account. If you do not already have a myGov account, it is easy to create. Click here for instructions on how to do this.
To clarify, an income statement is different to a payment summary. We are no longer required to provide you with a payment summary as we have been reporting your payroll data for the financial year through Single Touch Payroll (STP).
Other general information regarding how STP has changed the end of year process can be found here."
This text is fixed and cannot be tailored/configured by users.
Navigating the Single Touch Payroll screen
If at any time, you click on 'Save for later' in the Wizard, you can easily navigate back to the Wizard from the Reporting > Single Touch Payroll screen.
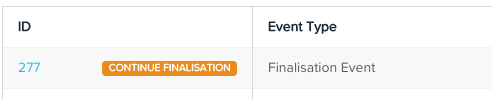
Clicking on the label CONTINUE FINALISATION will take you back to the finalisation event in the wizard format. Clicking on the event ID (ie '277' in the above image) will take you to the finalisation event in non-wizard format.
Lodging an amended Finalisation Event
If, after having successfully lodged a finalisation event for a specific pay schedule, you realise that an adjustment or adhoc pay must be processed for the same financial year, you MUST process an amended finalisation event. You must also do this as quickly as practicably possible to ensure the employee does not use an outdated Income Statement to lodge their tax return. If you're unsure of when you'll be able to do this, we strongly suggest you create and lodge an update event for the employee and mark as is not final so that the status of the employee's Income Statement is no longer 'Tax ready'.
Instructions on how to create and lodge an amended finalisation event can be found here.
Fixing RESC amounts that have been incorrectly reported
In order to fix any RESC amounts that have been incorrectly reported, you can do this by creating an update event and following the instructions in this article. You'll then need to either delete the finalisation event and create a new one, or if you have already lodged the finalisation event, you'll need to create and lodge an amended finalisation event after the RESC data has been fixed.
Note: The 'correct RESC values' action can only be completed for FY21/22 and prior STP events.
Closely held payees who are reported on a quarterly basis
Closely held payees who are reported on a quarterly basis will be included in a separate finalisation event at the end of the financial year. For more information, see here.

Closely held employees who are reported on a 'per pay run' basis will automatically be included in the standard finalisation event with arm's length employees.
If you have any questions or feedback, please email us at support@yourpayroll.com.au.